Since the day I purchased the Infiniti G35 Coupe, there was a belt squeal on cold starts that would go away after a minute of the engine getting warm and would not appear until the next cold start. After some research, I found that it was due to the main drive belt not being tight enough.
The previous owner had replaced the alternator before my purchase, but had used his uncalibrated thumb to test for the belt tension. I wanted to make sure that the belts were new and proactively decided to replace the idler pulleys as well. This post talks about how to do that. If you just want to check and adjust the belt tension, you can skip to the last section.
This job is actually relatively easy, and can be done within an hour or two if you have the parts available. However, my car has some rust and the adjustment bolts needed replacement, which delayed the process for me.
PARTS REQUIRED
I chose to use performance aftermarket parts for the belts and pulleys.
- Gates 36336 Drive Idler Pulley
- Gates 36321 Air Conditioner (AC) Idler Pulley
- Gates K060465 Micro-V Drive Belt
- Gates K040372 Micro-V AC Belt
11948-AL50AOEM Nissan replacement adjustment bolt11928-AL50AOEM Nissan replacement pulley shaft- 14mm and 12mm sockets, 3/8” drive socket wrench and socket extensions
- Continental 9001 Krikit Belt Tension Gauge
- Gates 91132 Krikit Belt Tension Gauge
MAIN DRIVE PULLEY REPLACEMENT
In an Infiniti G35 or Nissan 350Z, there are two drive belts as shown in Figure 1. The main drive belt drives the power steering pump, the alternator and the crankshaft pulley. The air conditioner is driven by a secondary drive belt that runs along the crankshaft pulley. This allows the car to have a disabled air conditioning unit, while still running the main drive belt.
Moreover, there is no spring loaded tensioner in the belts and pulley system, like that in a Porsche Boxster 986. Instead you have to use an adjustment bolt (B and D in Figure 1) to tighten the belts around the idler pulleys.
Figure 1 has been taken from EM.pdf from the service manual.
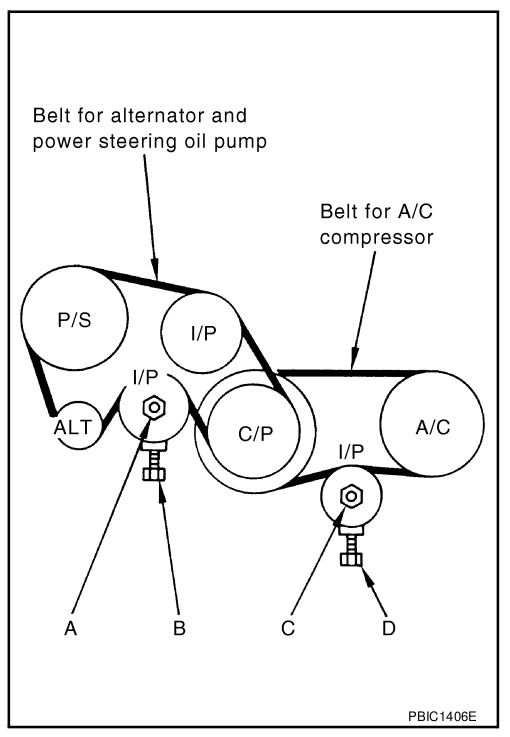 Figure 1. Engine Drive Belt System
Step 1: You will need to jack up the front of the car or put it on ramps. You also will need to take out the splash shield that protects the engine so that you can access the adjuster bolts from below the car as it is much more convenient.
Step 2: Remove the air-duct to allow for adjusting the belts from the top of the car. Figure 2 shows using yellow circles, the two retainer clips you need to remove using a trim removal tool to get the air-duct off.
 Figure 2. Remove the air-duct
Step 3: To simply tighten or adjust the belt, you need to loosen the nut A (Figure 1) shown by the red circle in Figure 3 and then tighten the nut B (Figure 1) shown by the yellow circle in Figure 3.
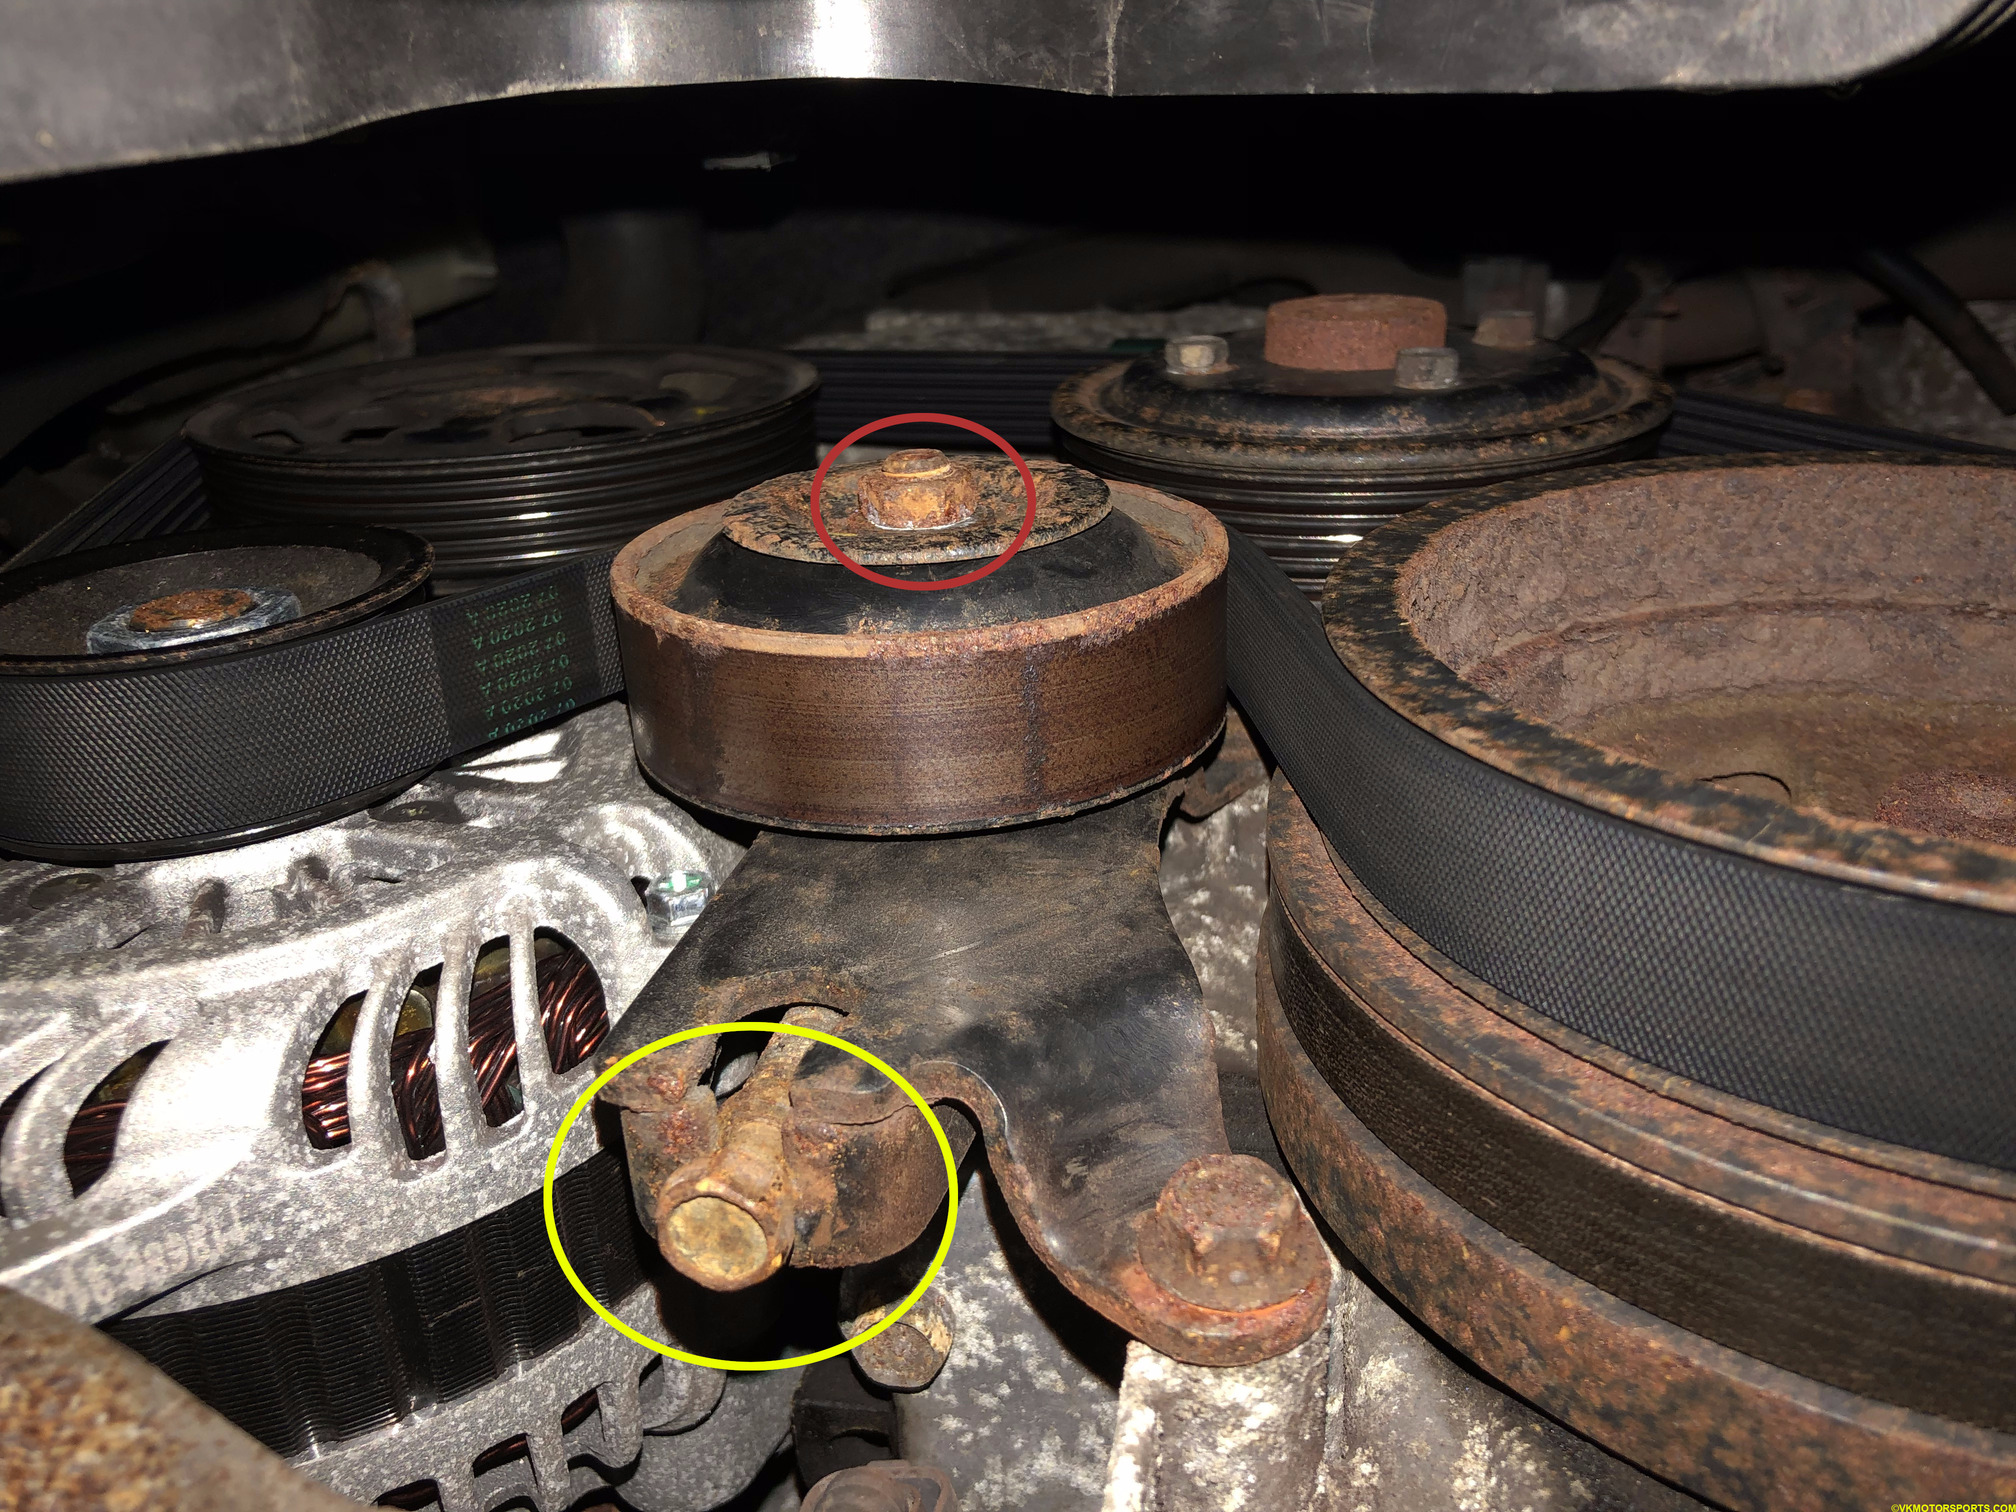 Figure 3. Pulley loosening nut and adjuster bolt
Step 4: Loosen the nut A holding the pulley to the shaft using a 14mm socket. Since we want to replace the pulley, we must remove the nut and the metal washers surrounding the pulley nut. NOTE: Maintain the orientation of these washers as that is crucial.
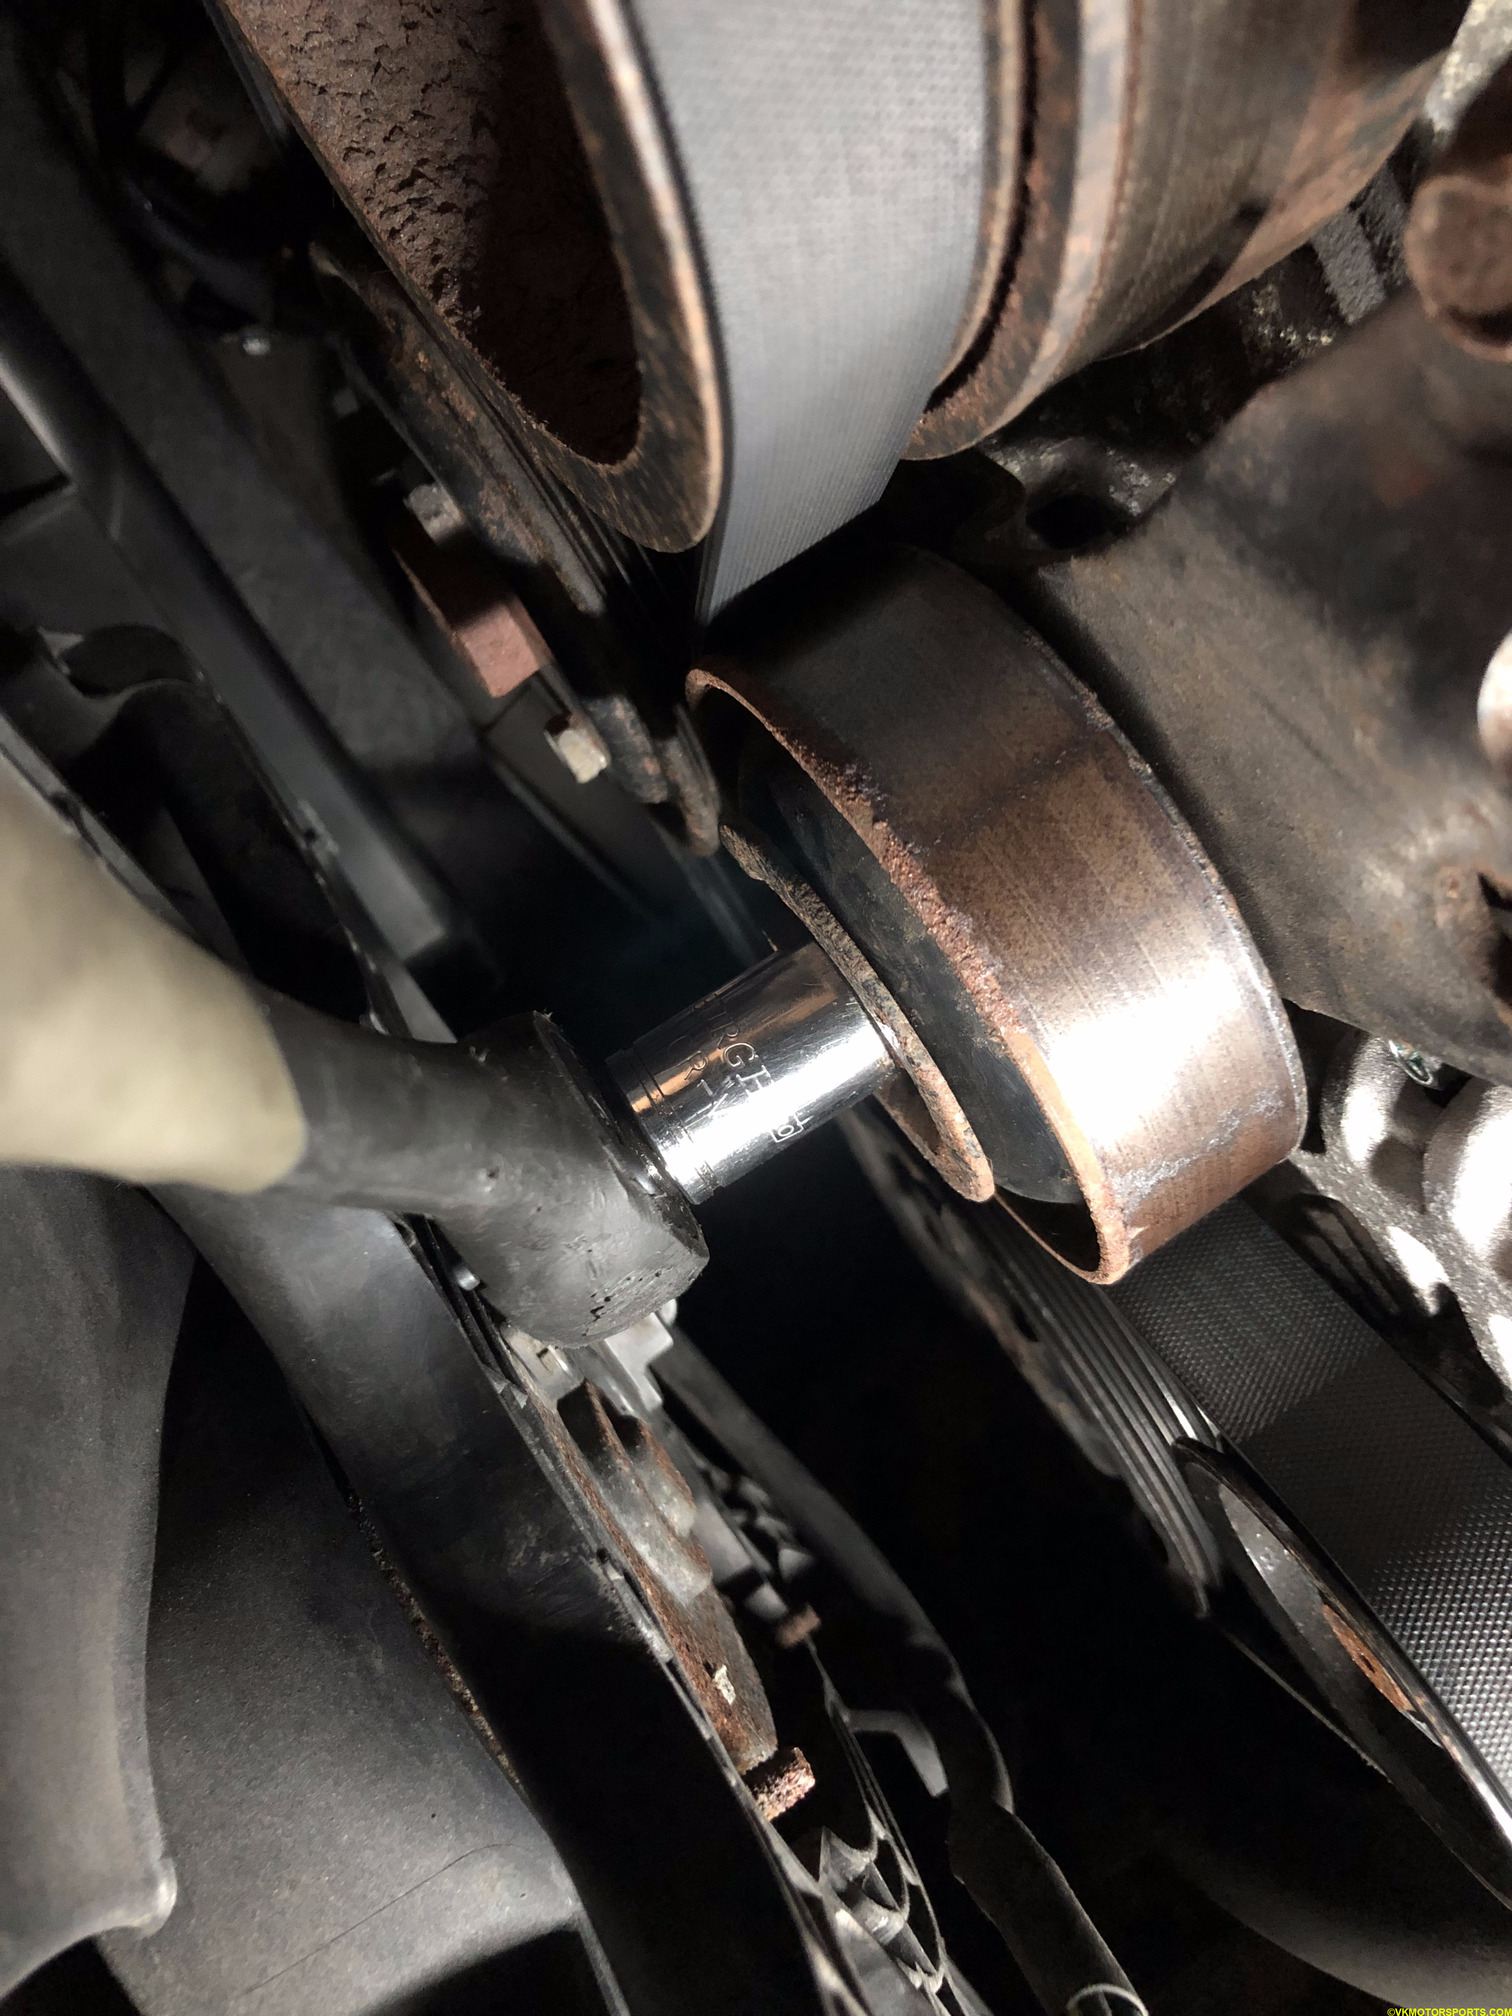 Figure 4. Loosen the pulley nut with a 14mm
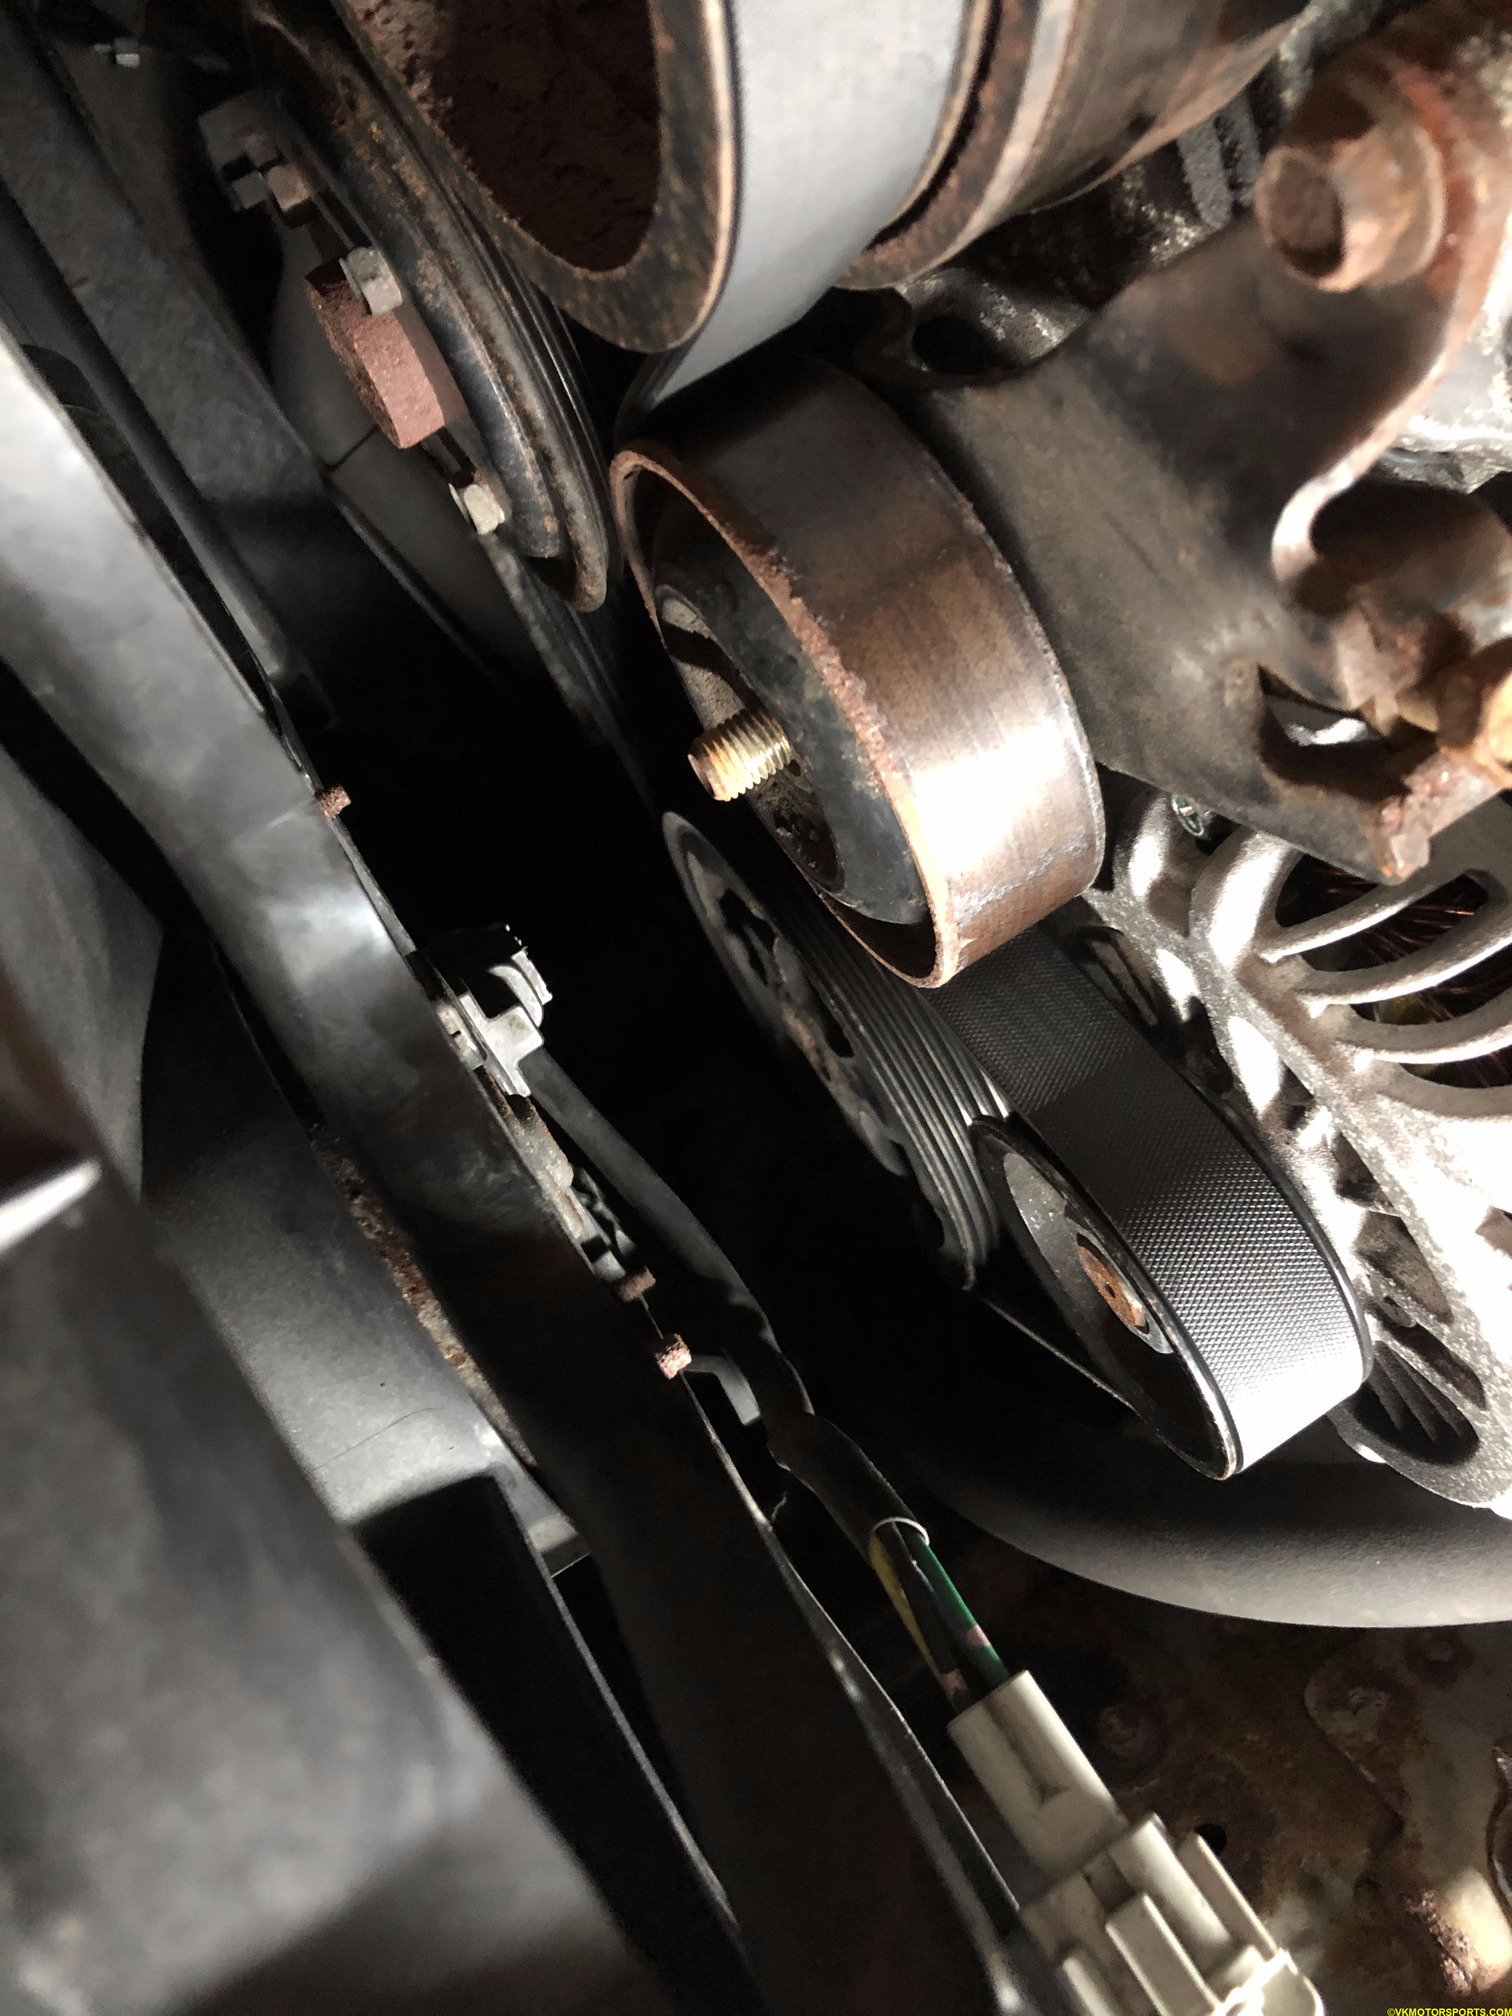 Figure 5. Pulley nut has been removed
Step 5: Loosen the adjuster bolt highlighted in Figure 6 and it will drop the pulley such that the belt can now come off with your hand as shown in Figure 7. You may have to get the full belt off from the top of the car which is why we had removed the air-duct in Step 1 above.
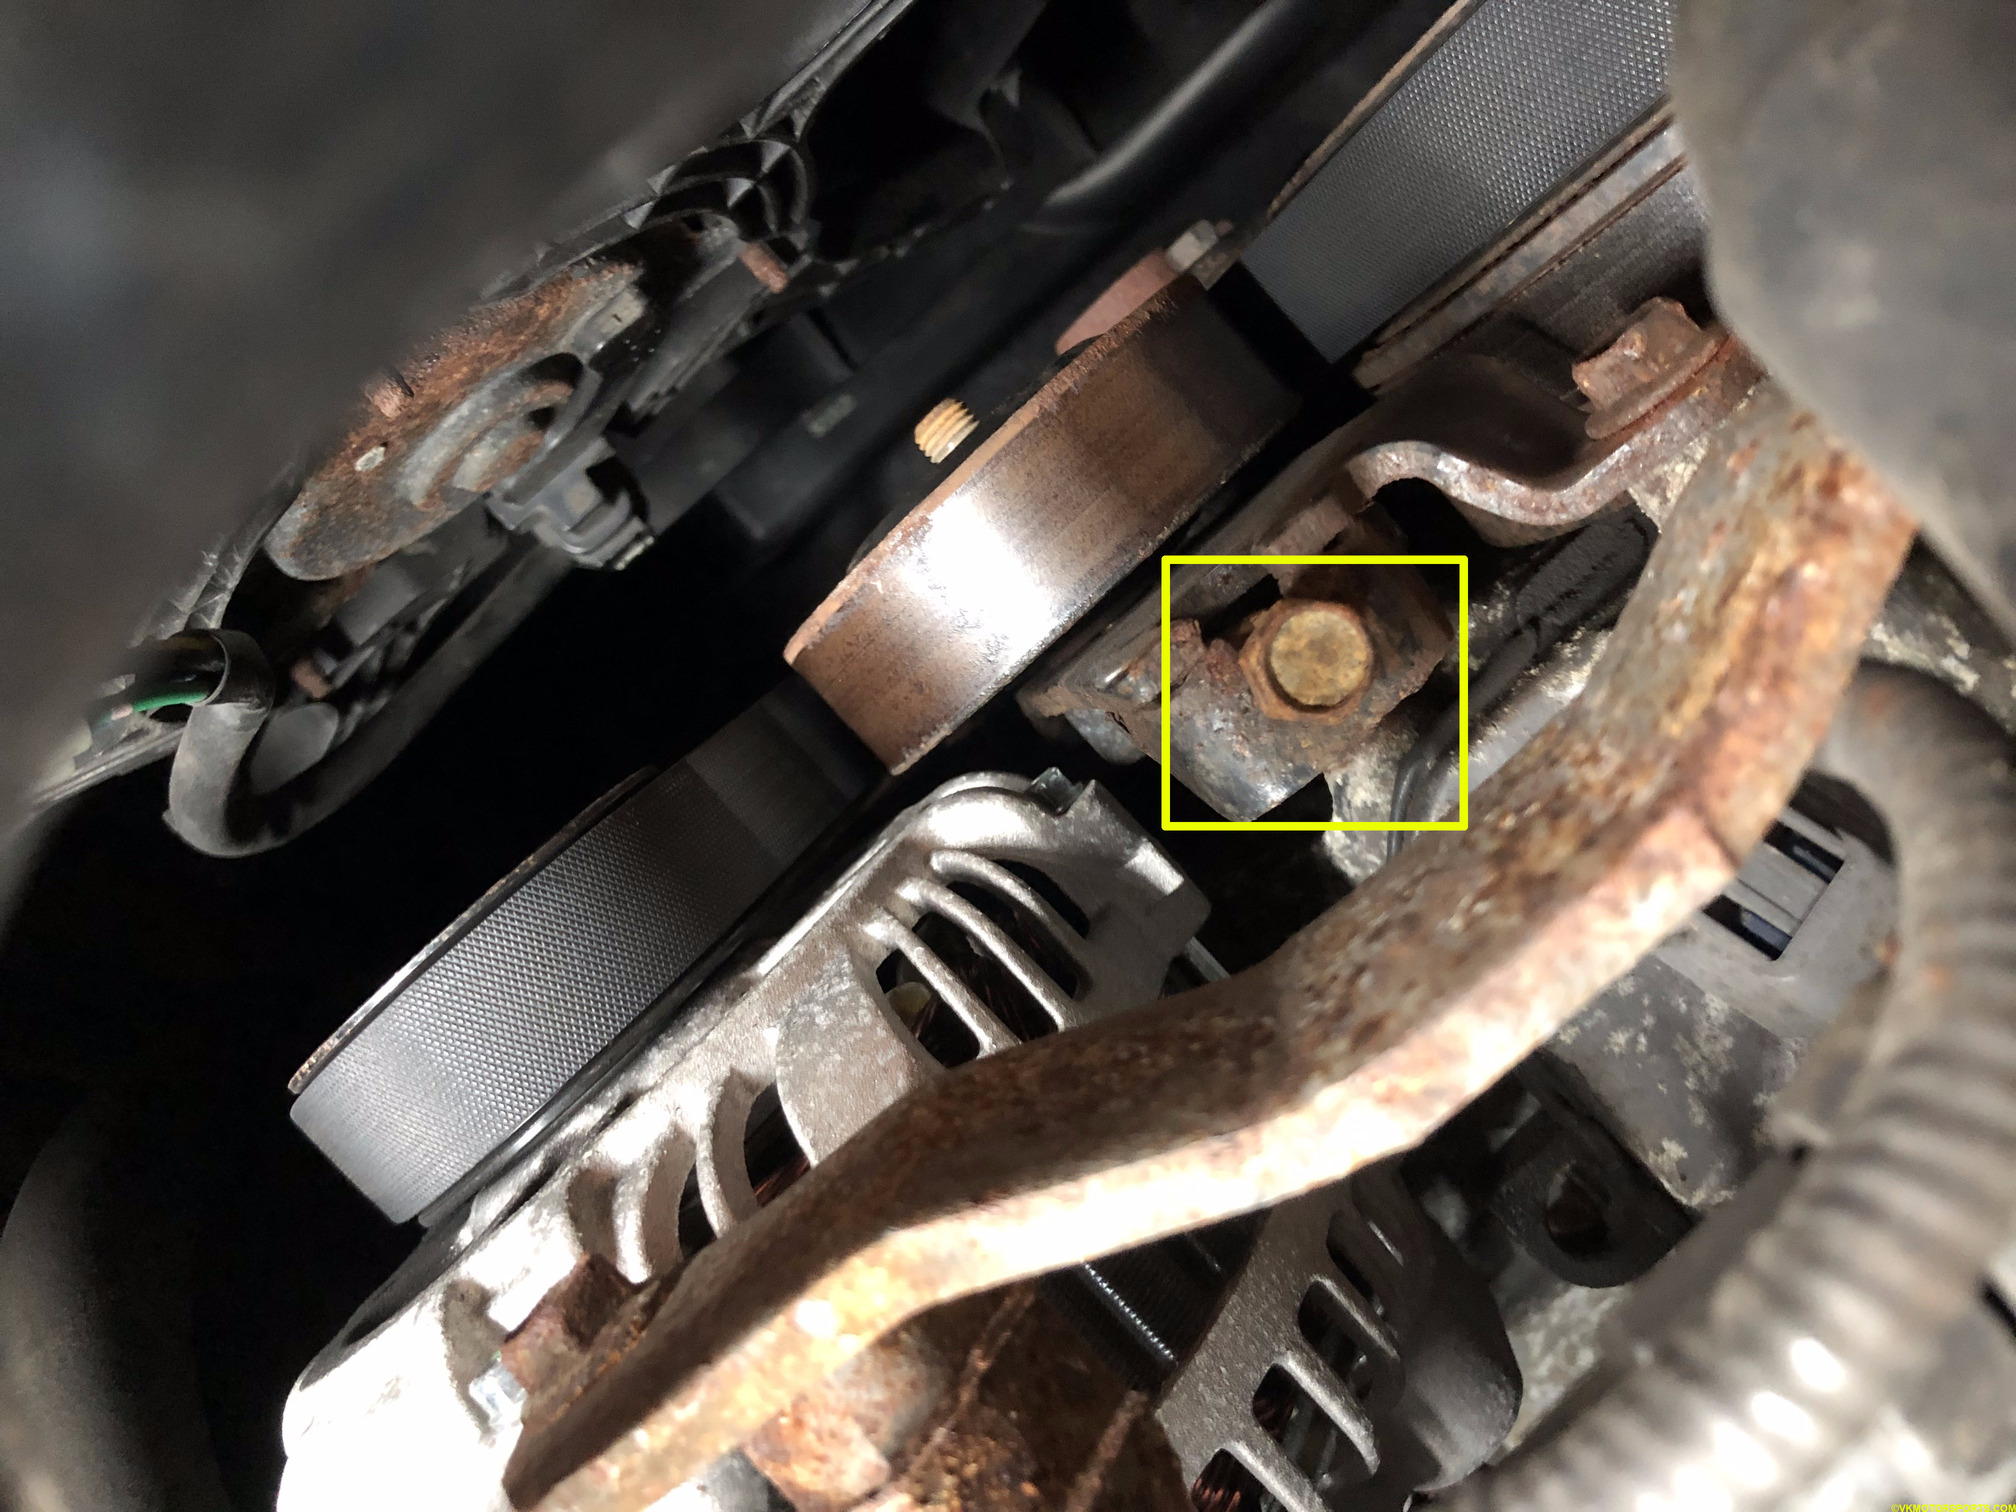 Figure 6. Loosen the adjuster bolt
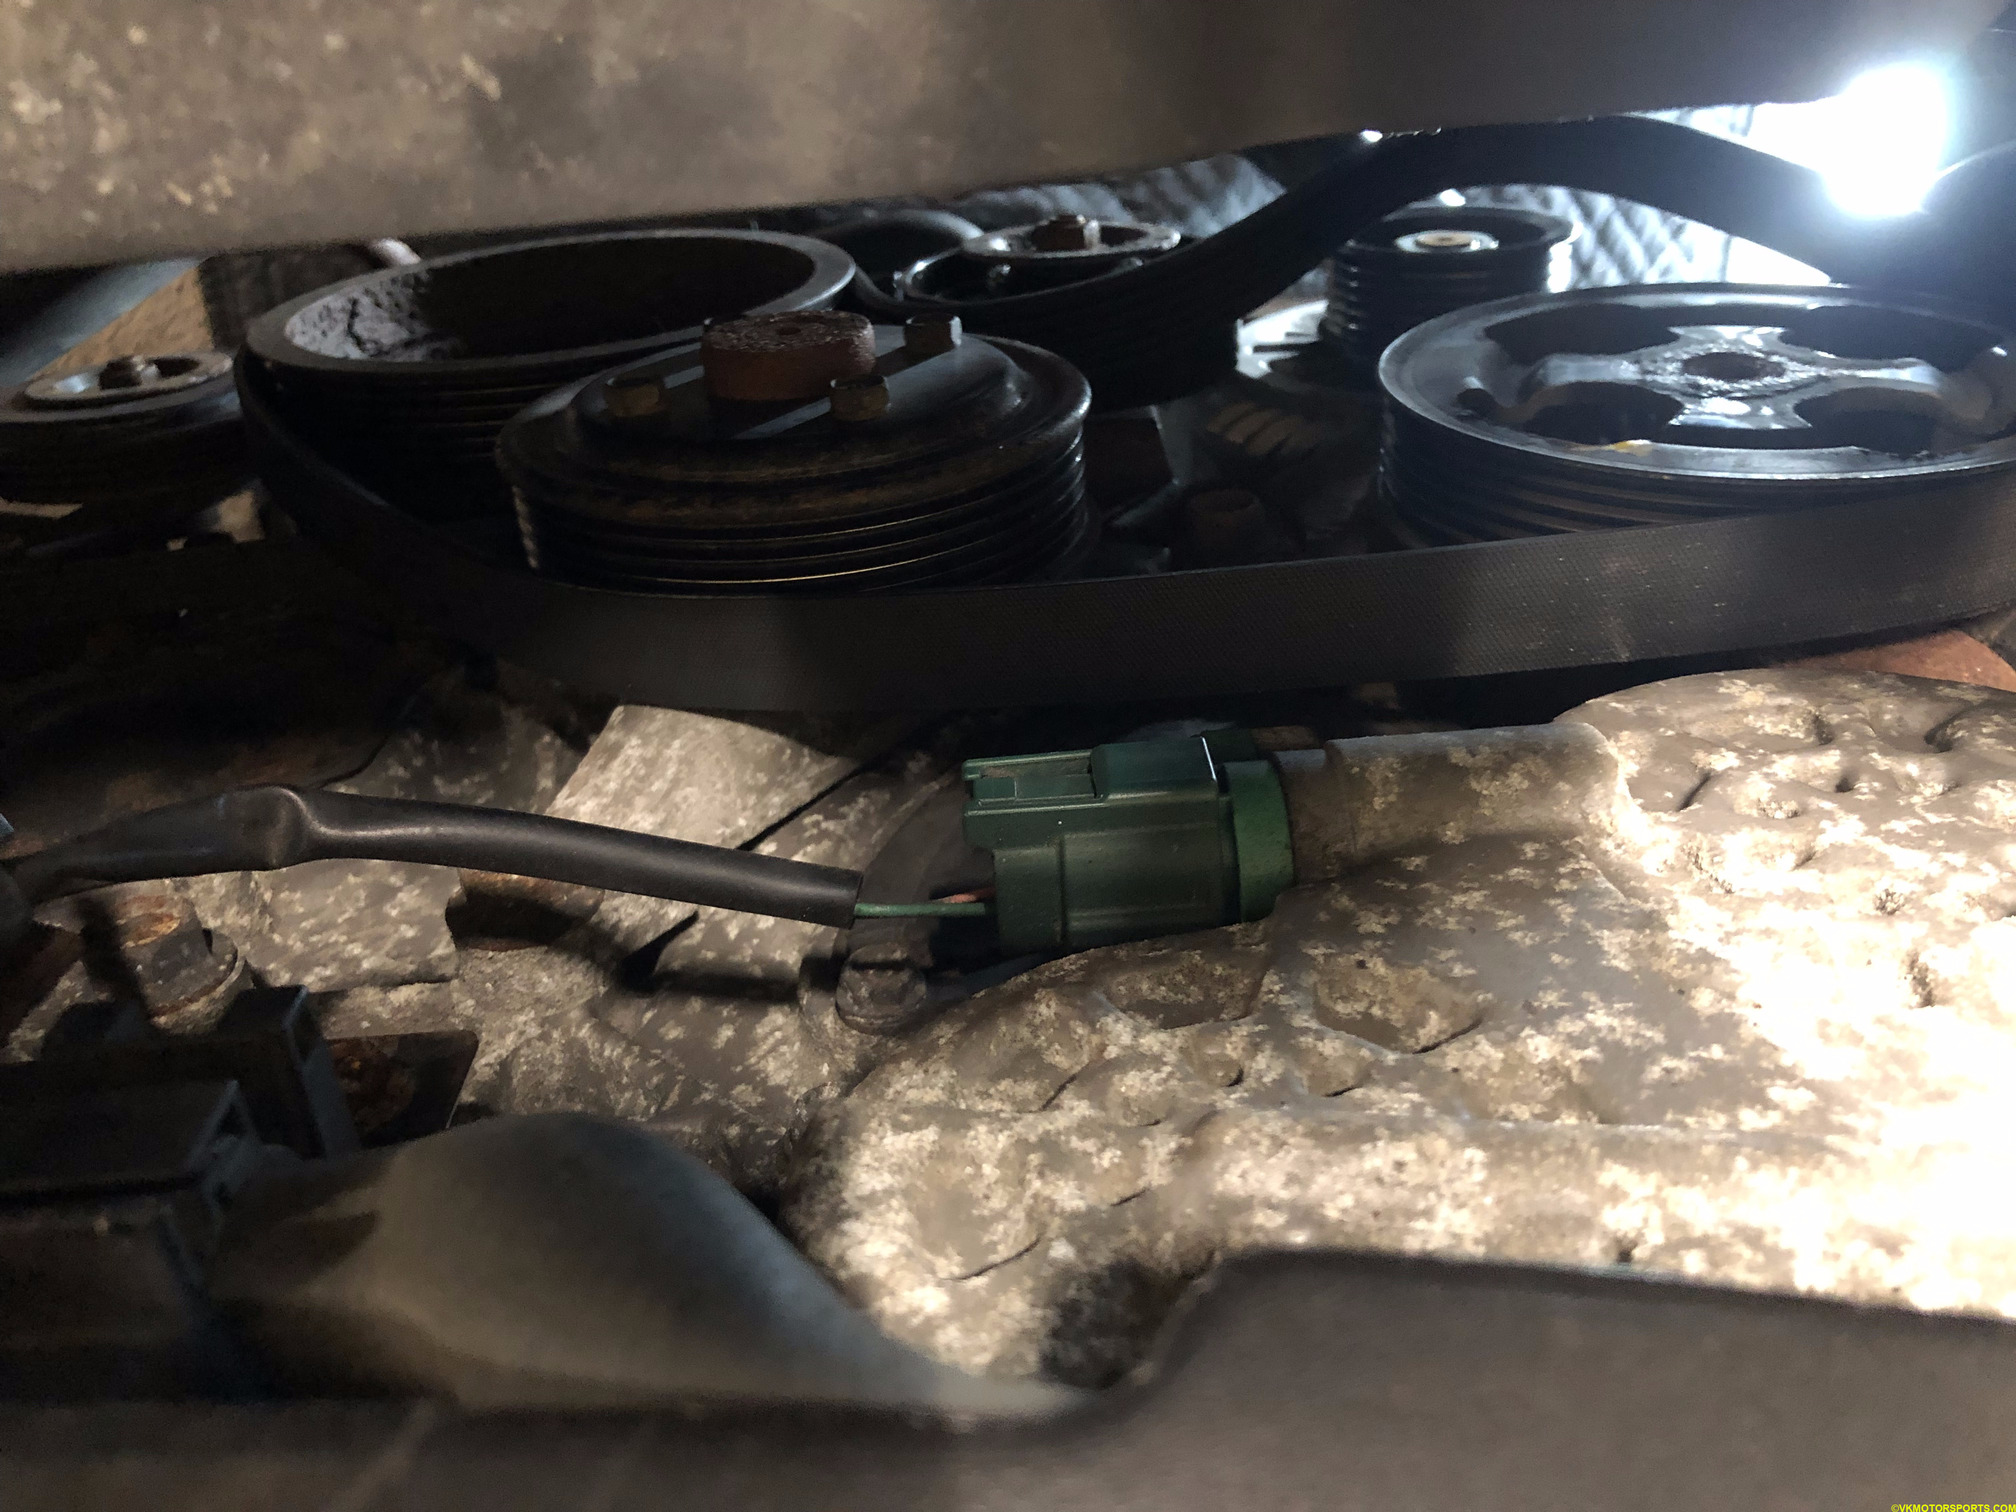 Figure 7. Remove the main drive belt
Step 6: To replace the pulley, you need to get the old pulley off the shaft it is on (Figure 8), and get the new pulley shown in Figure 9 installed back on as shown in Figure 10. Remember to maintain the same orientation of all the washers. The pulley used here is the Gates 36336. You can see that my old pulley is quite rusty, in Figure 9, and it is prudent to update your pulley if it is in poor shape.
Figure 10 and 11 show the new pulley installed from both the top and bottom view, and the belt has been fully removed.
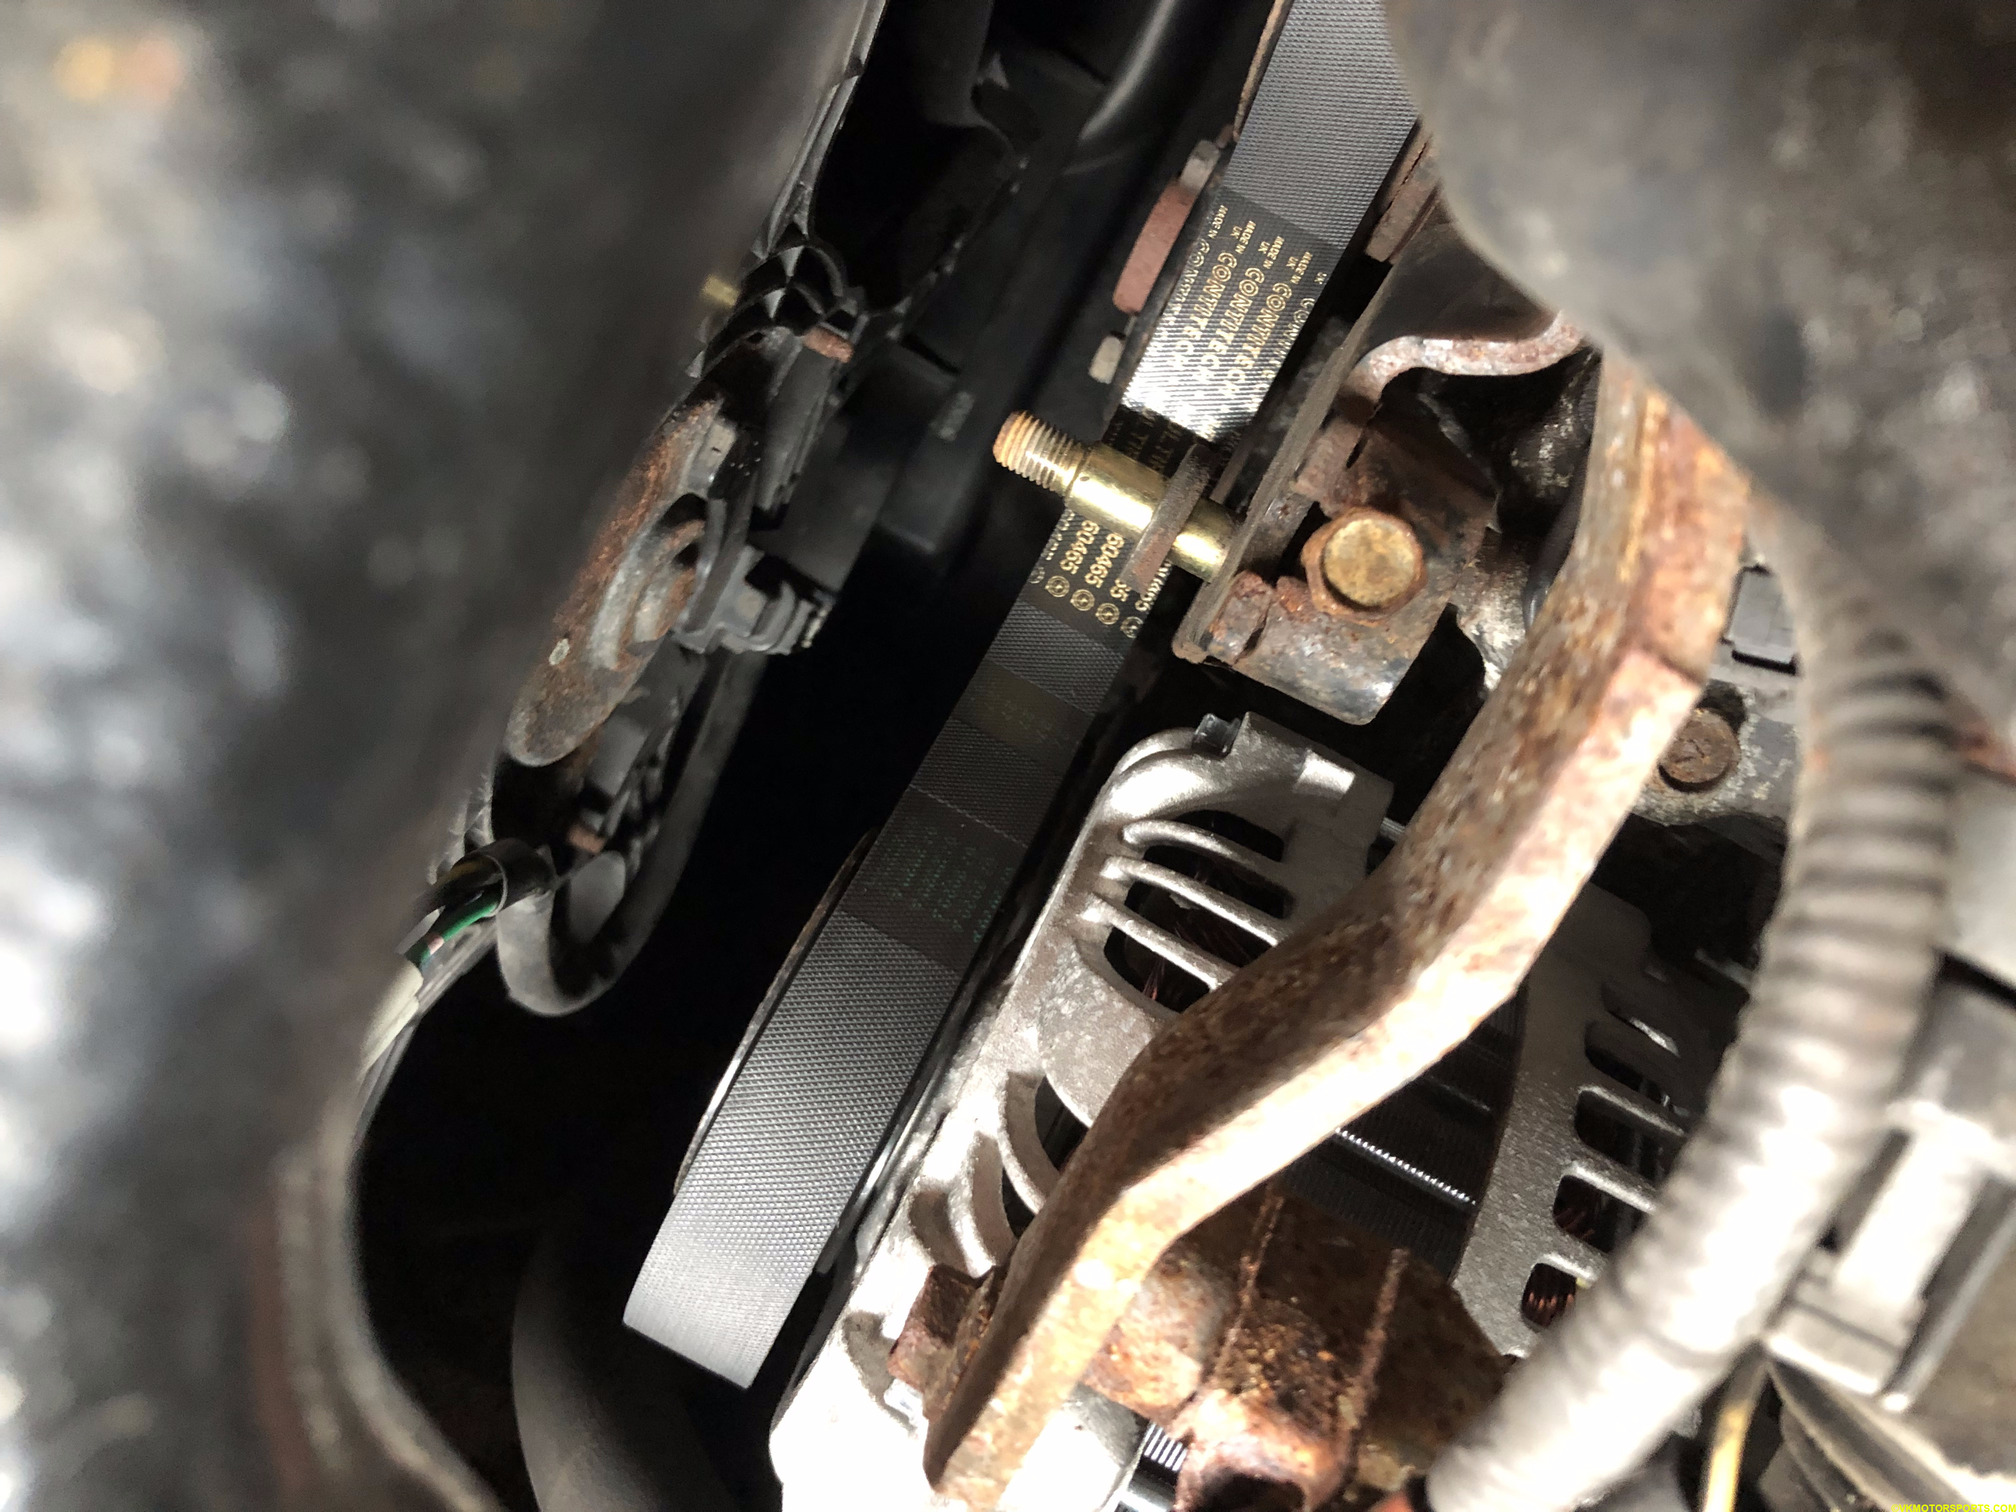 Figure 8. Remove the old pulley
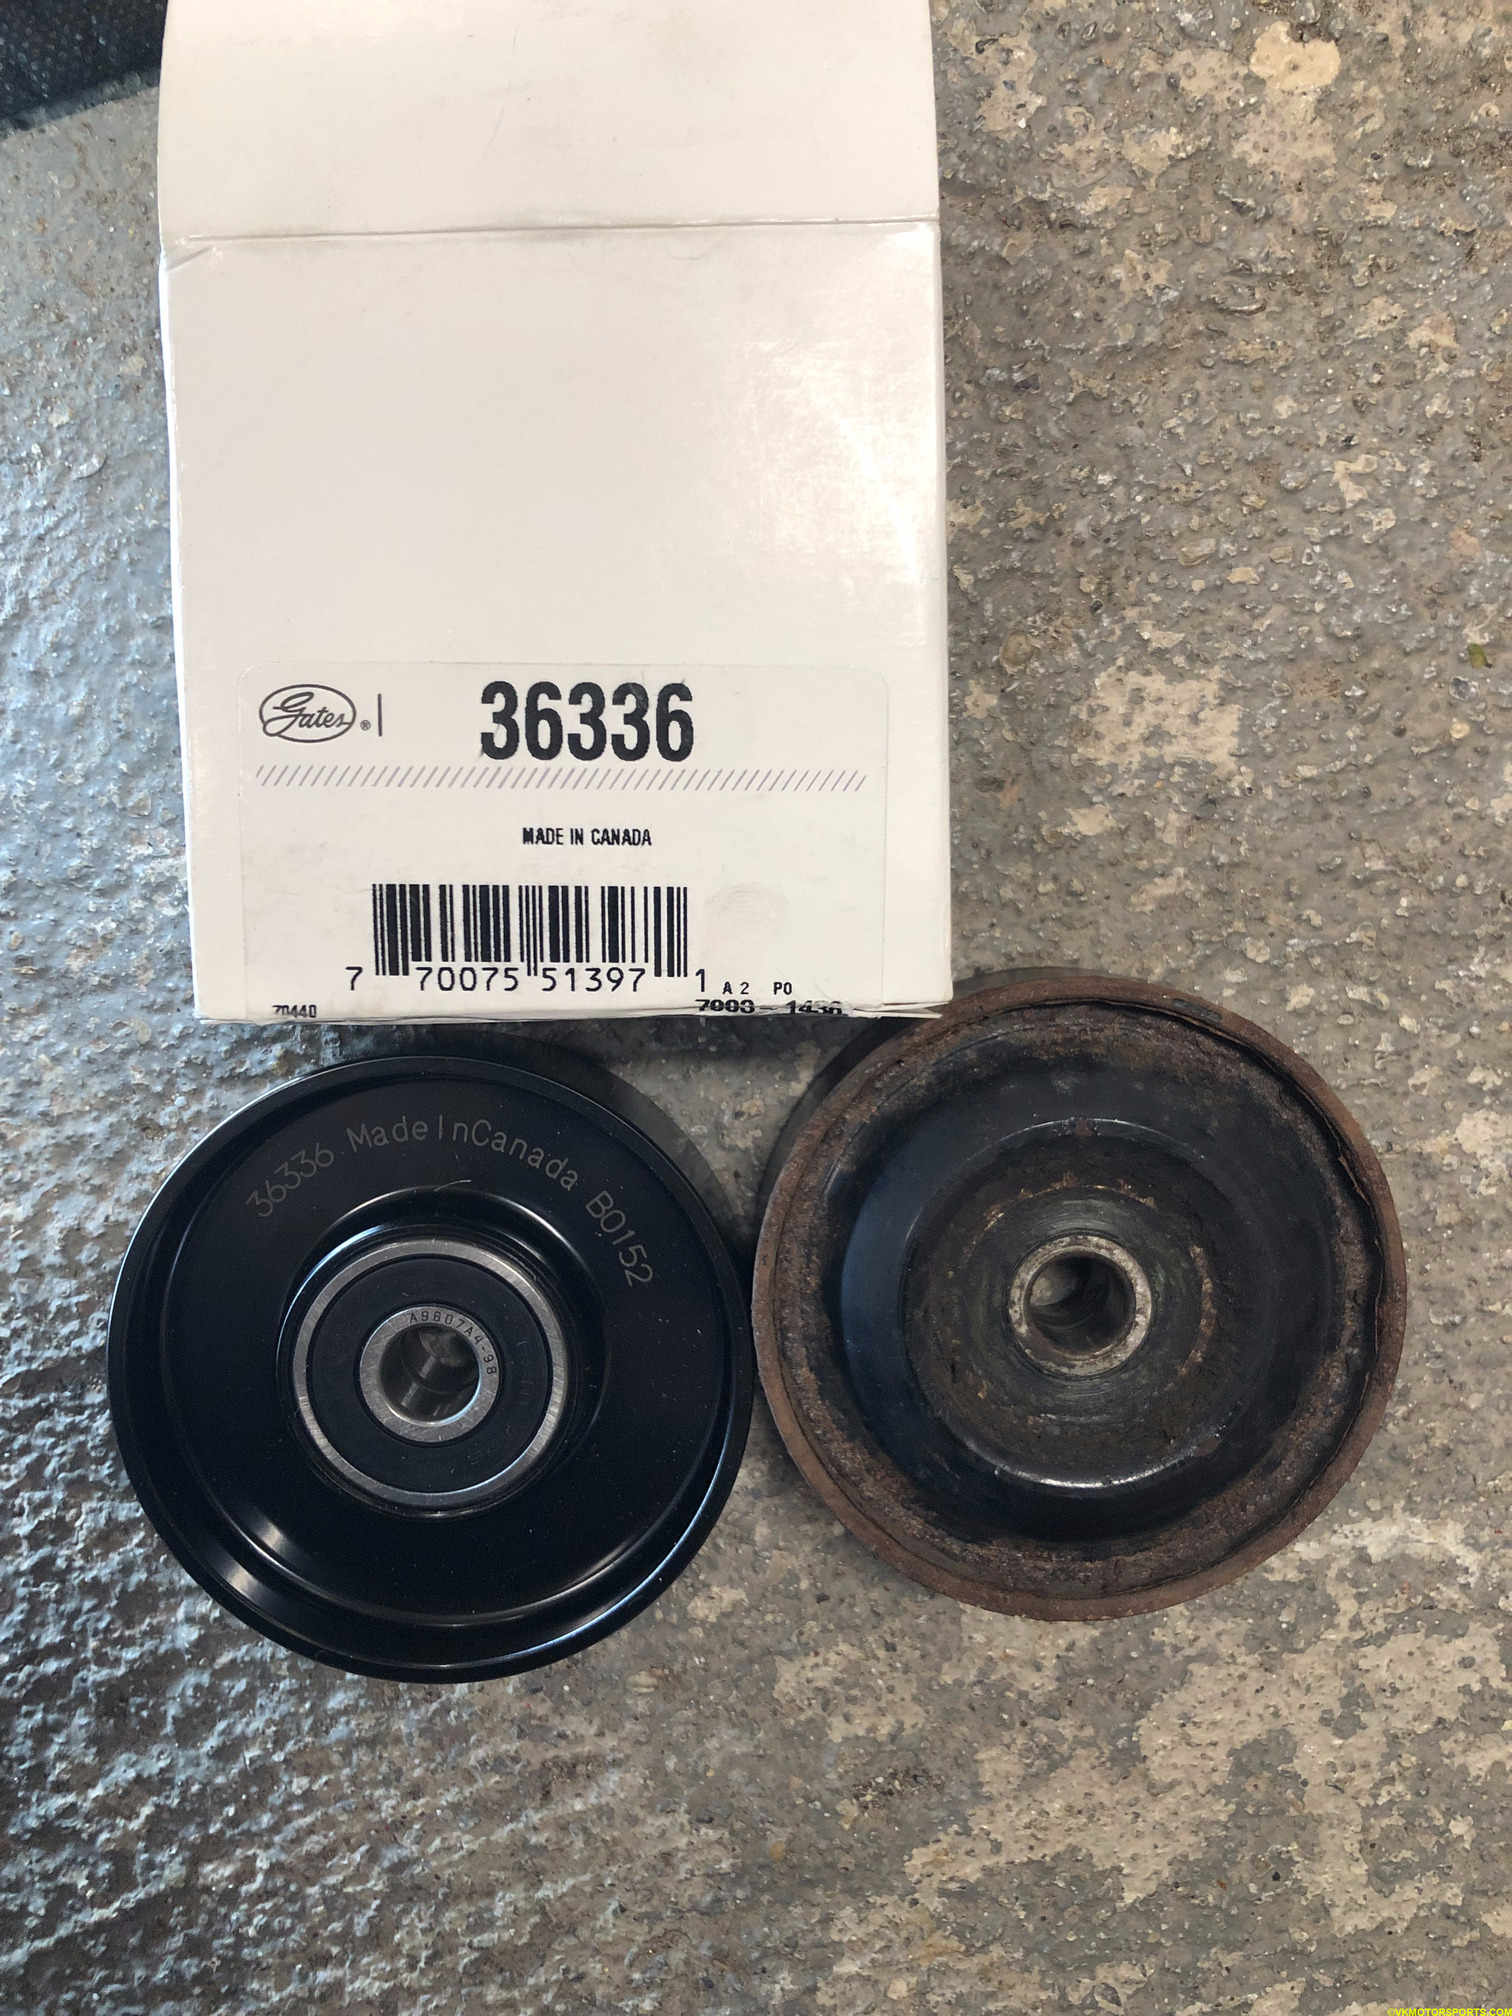 Figure 9. Comparing the new and old pulleys
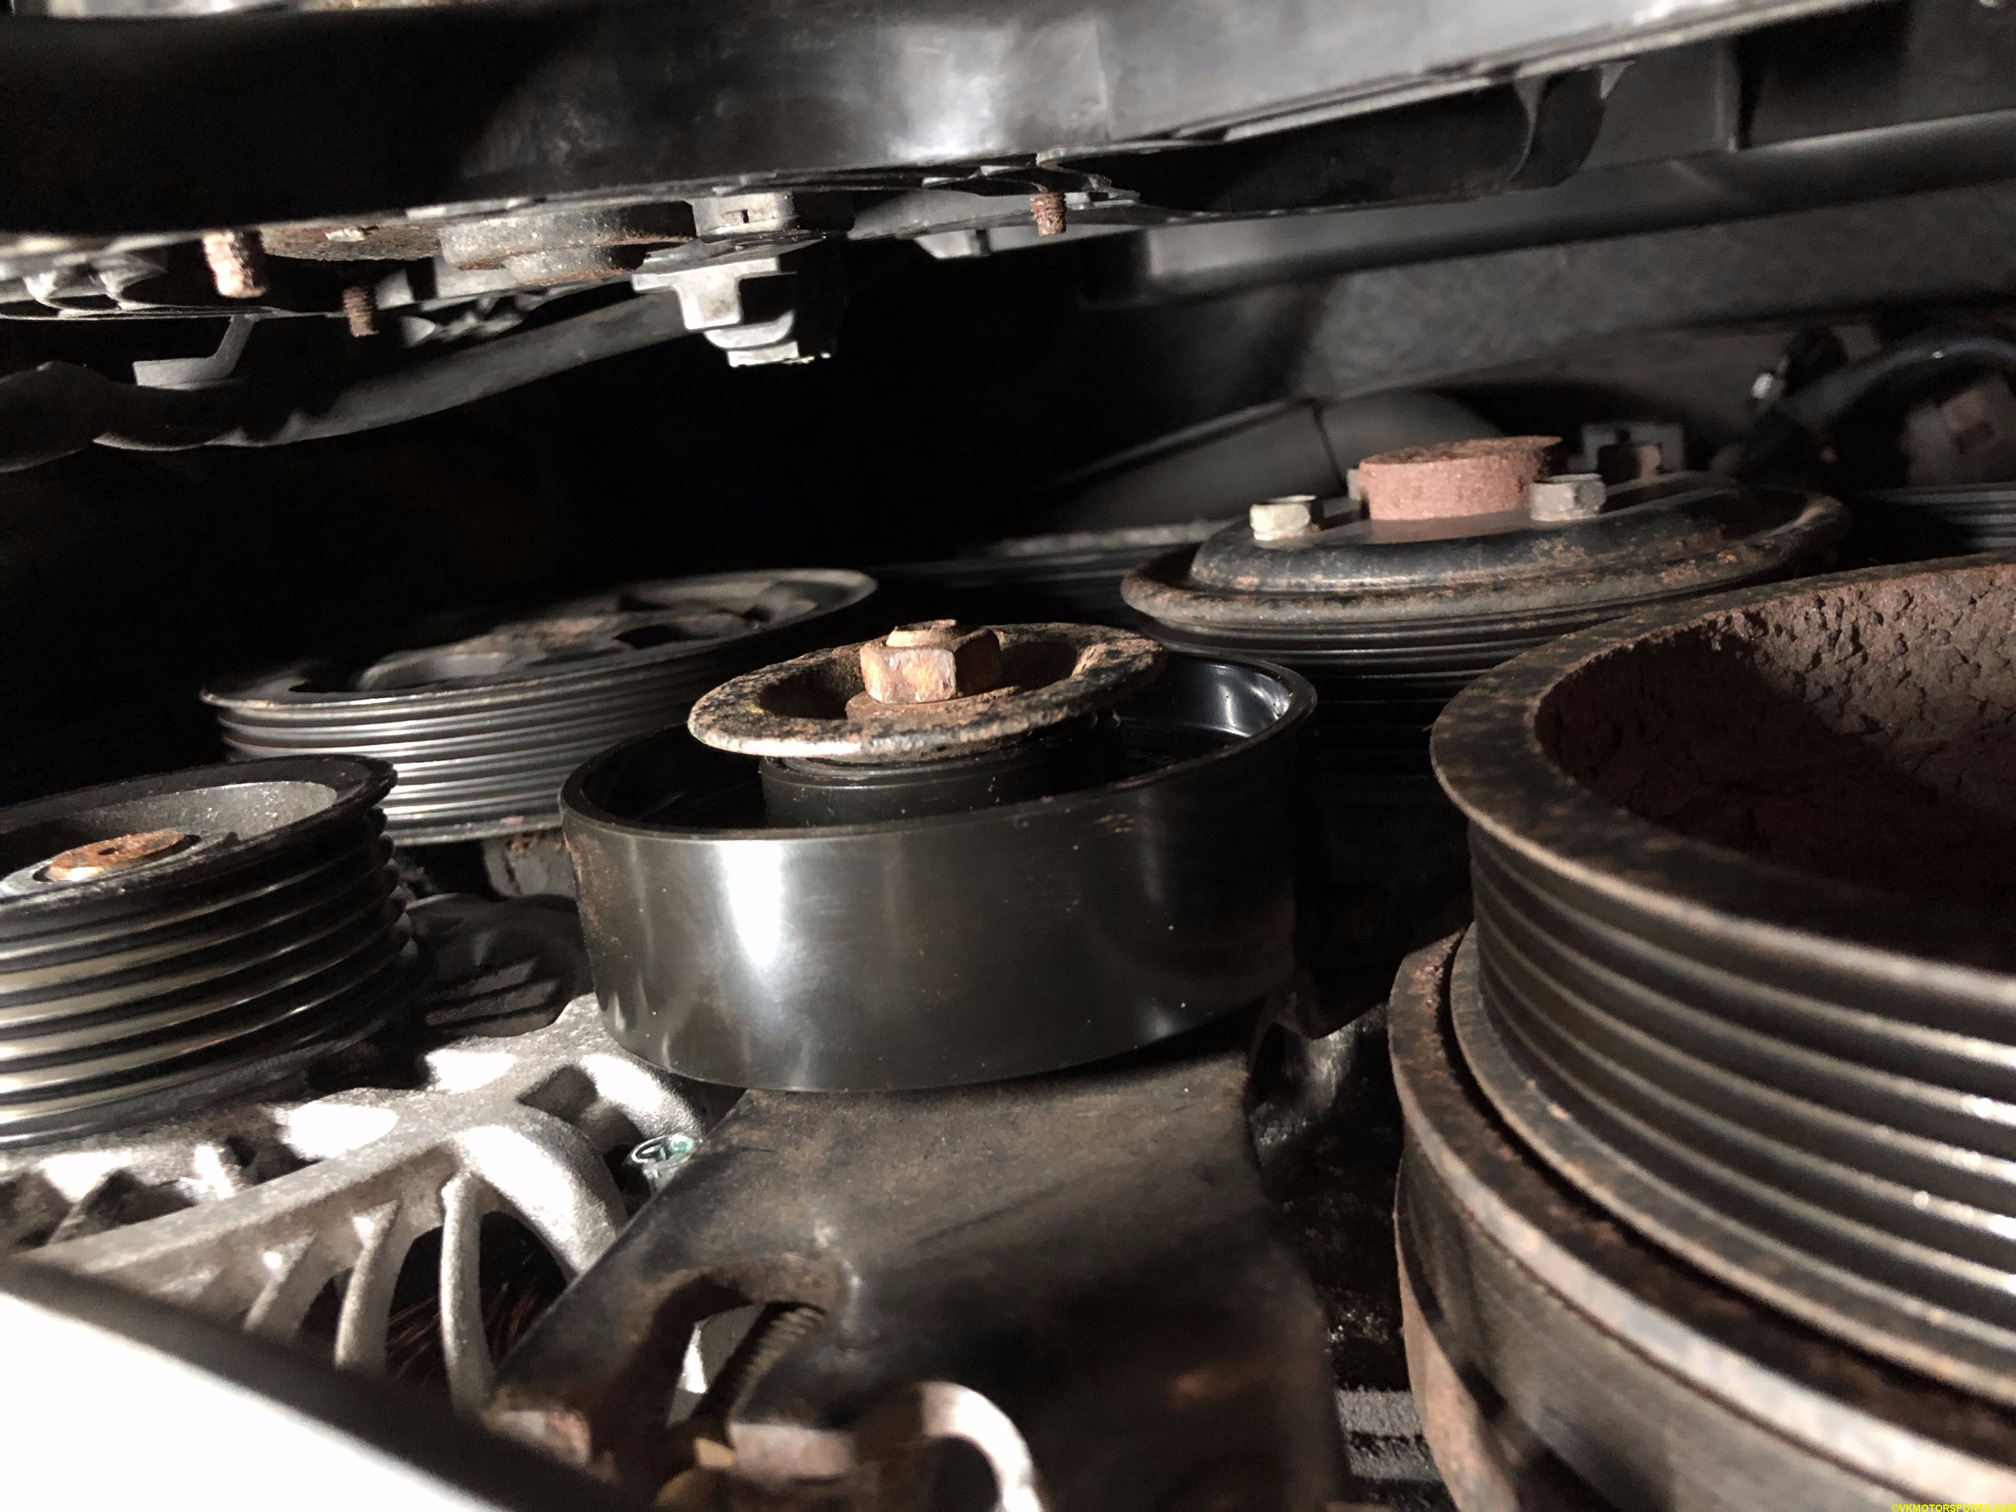 Figure 10. New pulley installed - bottom view
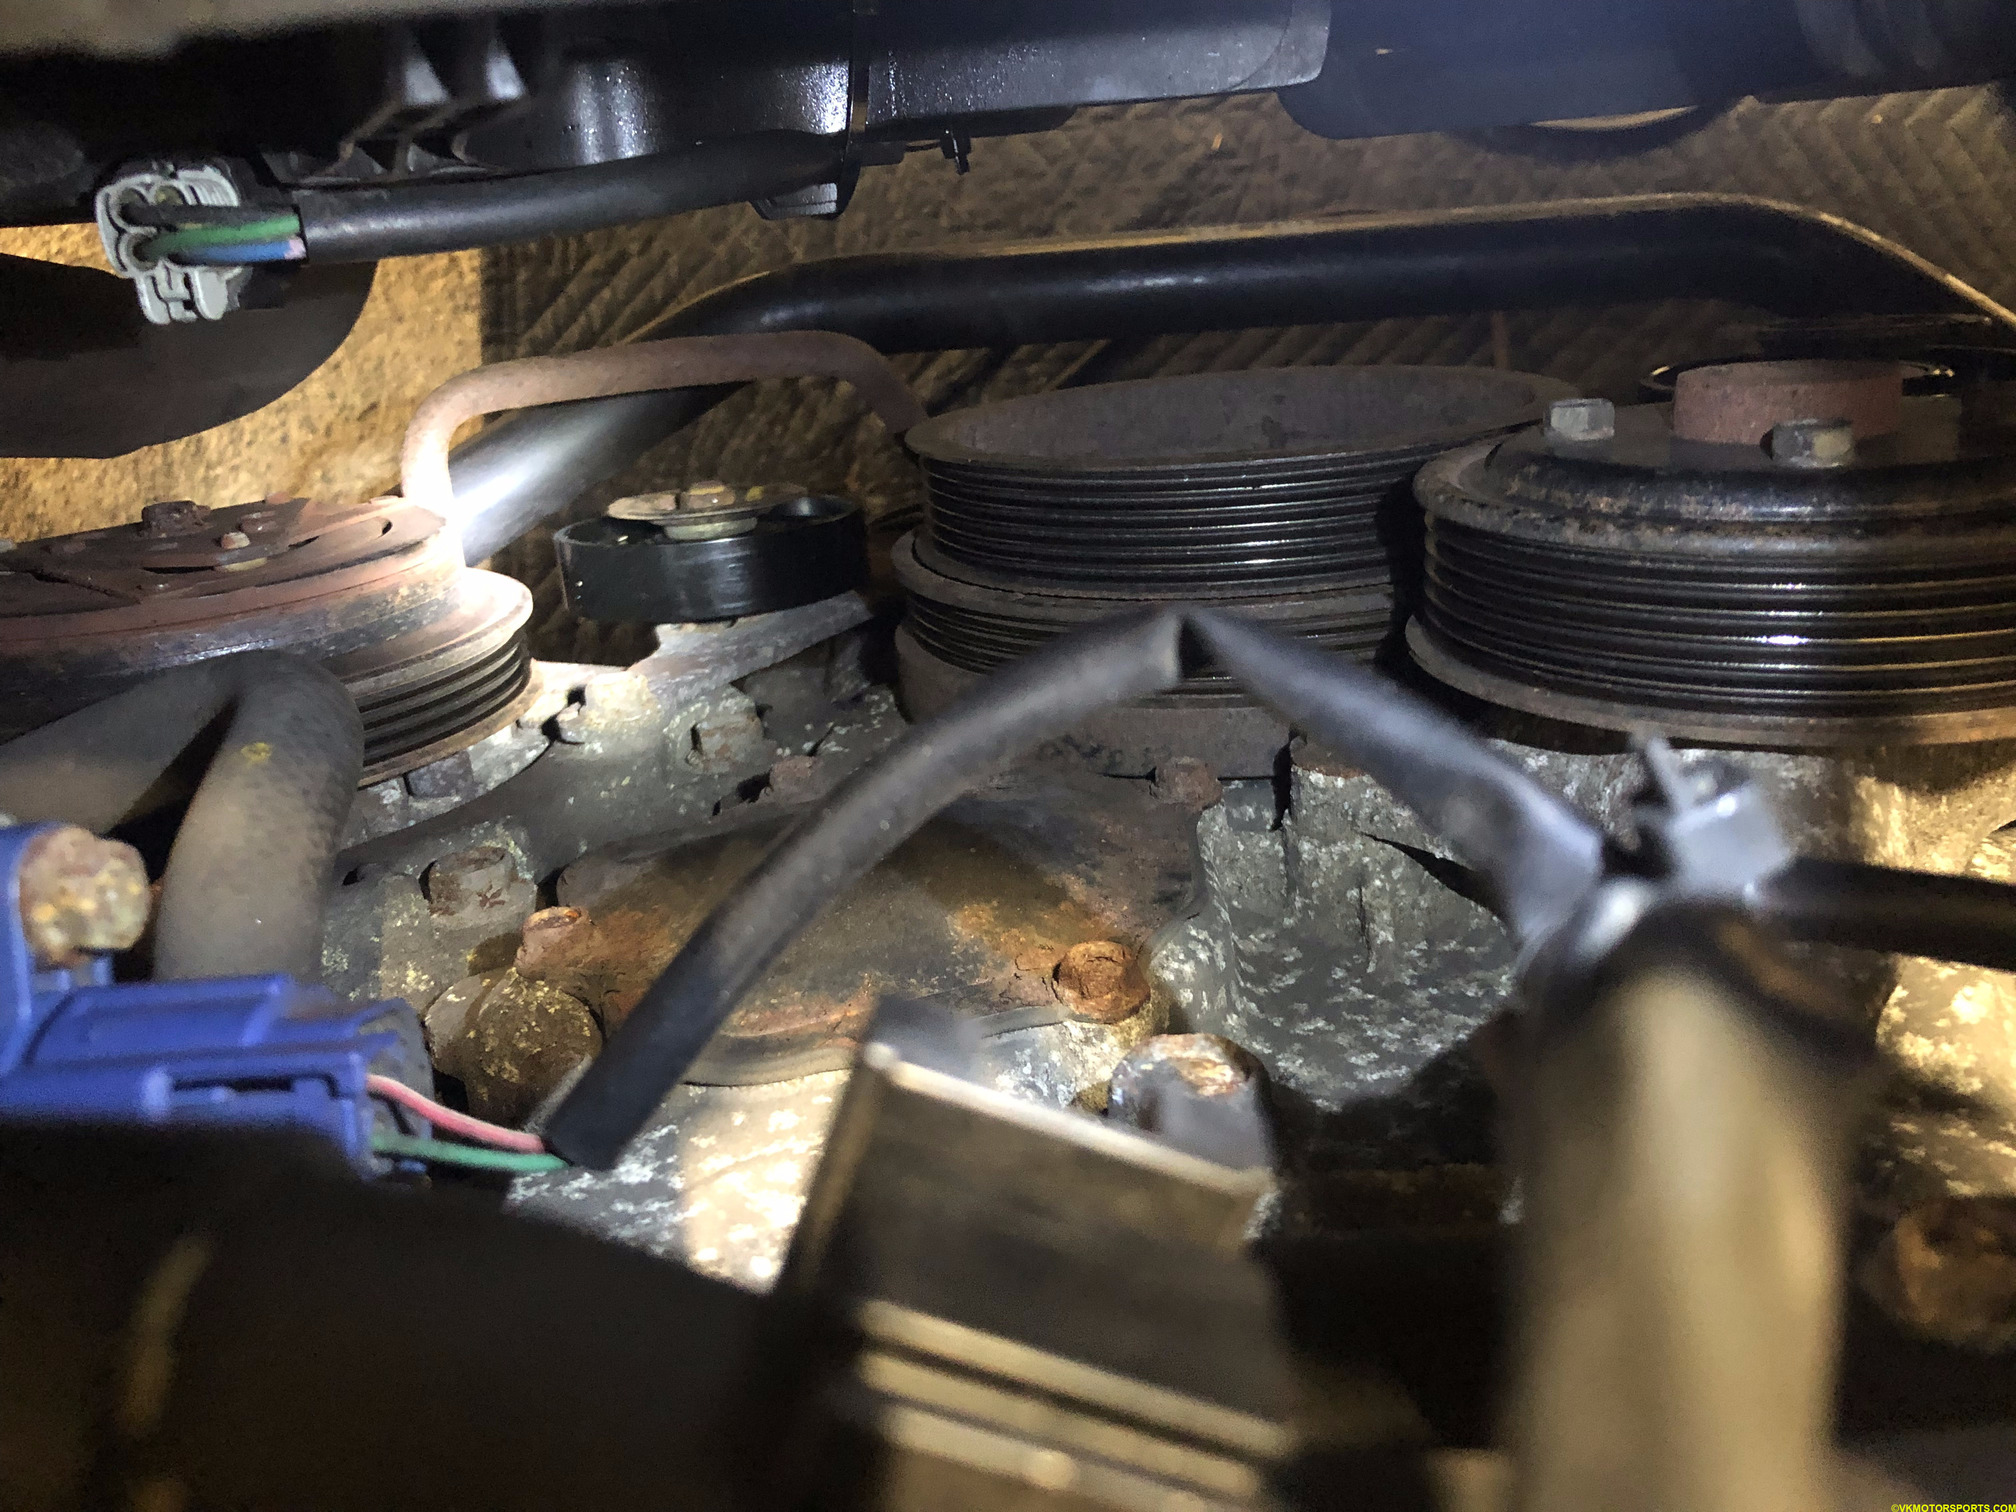 Figure 11. New pulley installed - top view
Keep the nut A (as in Figure 1) slightly loose for now, until the belt has been installed and the belt tension has been achieved.
AC DRIVE PULLEY REPLACEMENT
Similar to the main drive belt pulley, you have an AC idler pulley that is slightly smaller and below the crankshaft pulley as shown in Figure 1 above. Figure 12 below shows the pulley as viewed from under the car. If you squint, you can see that the AC belt has some cracks and it is time to replace it. Figure 13 also shows the adjuster bolt of the AC idler pulley (nut D in Figure 1) from under the car.
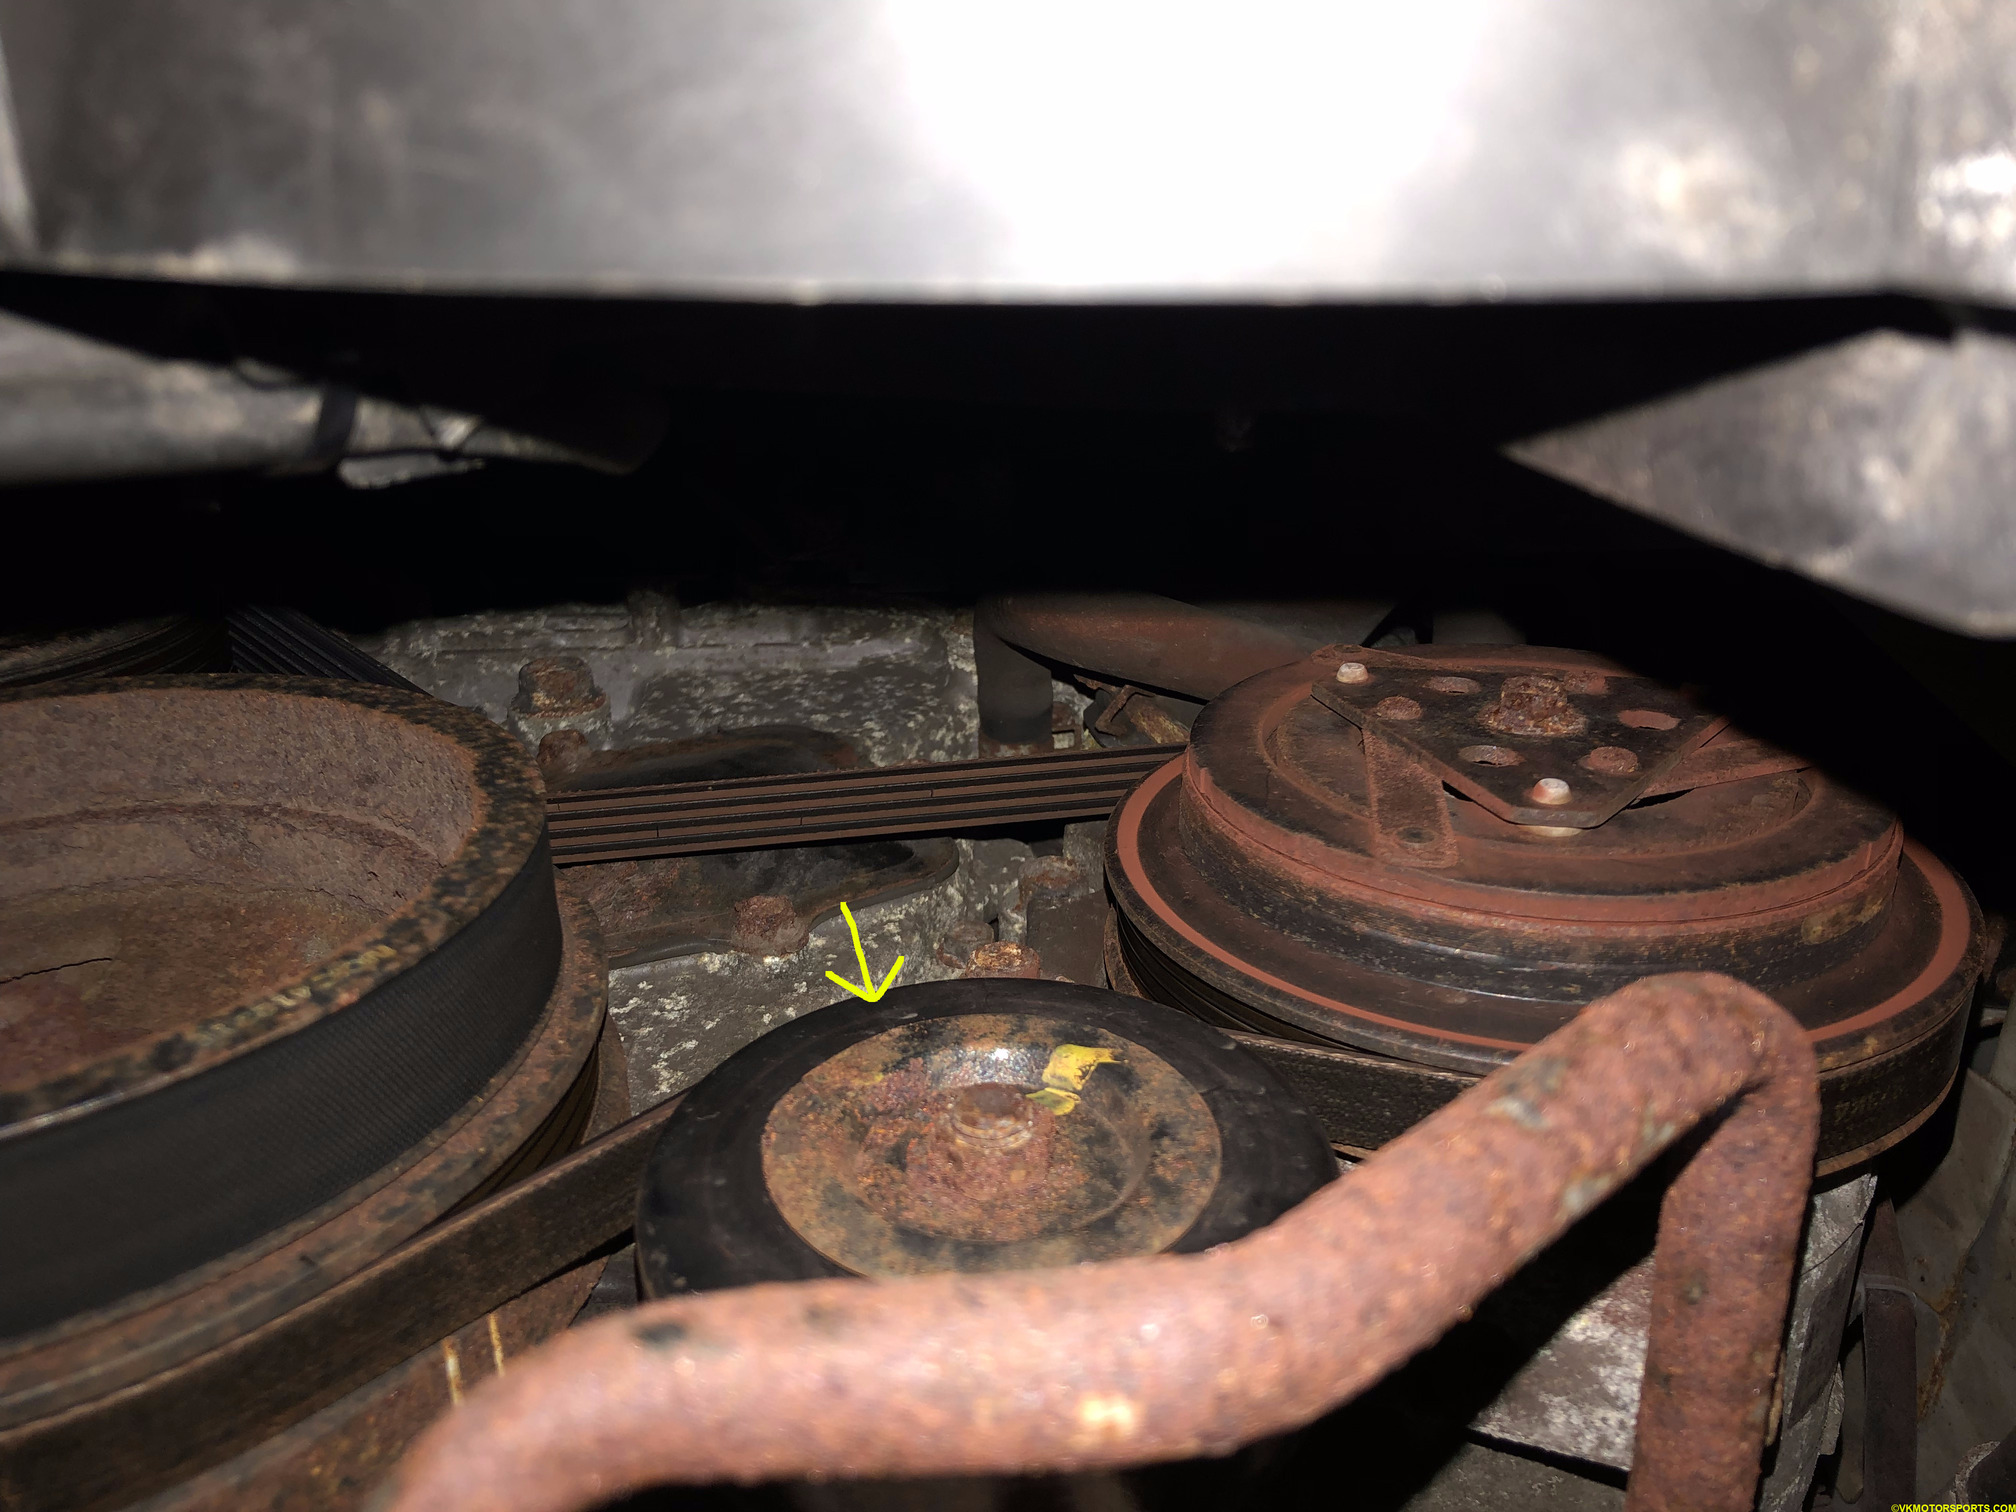 Figure 12. AC Pulley and belt
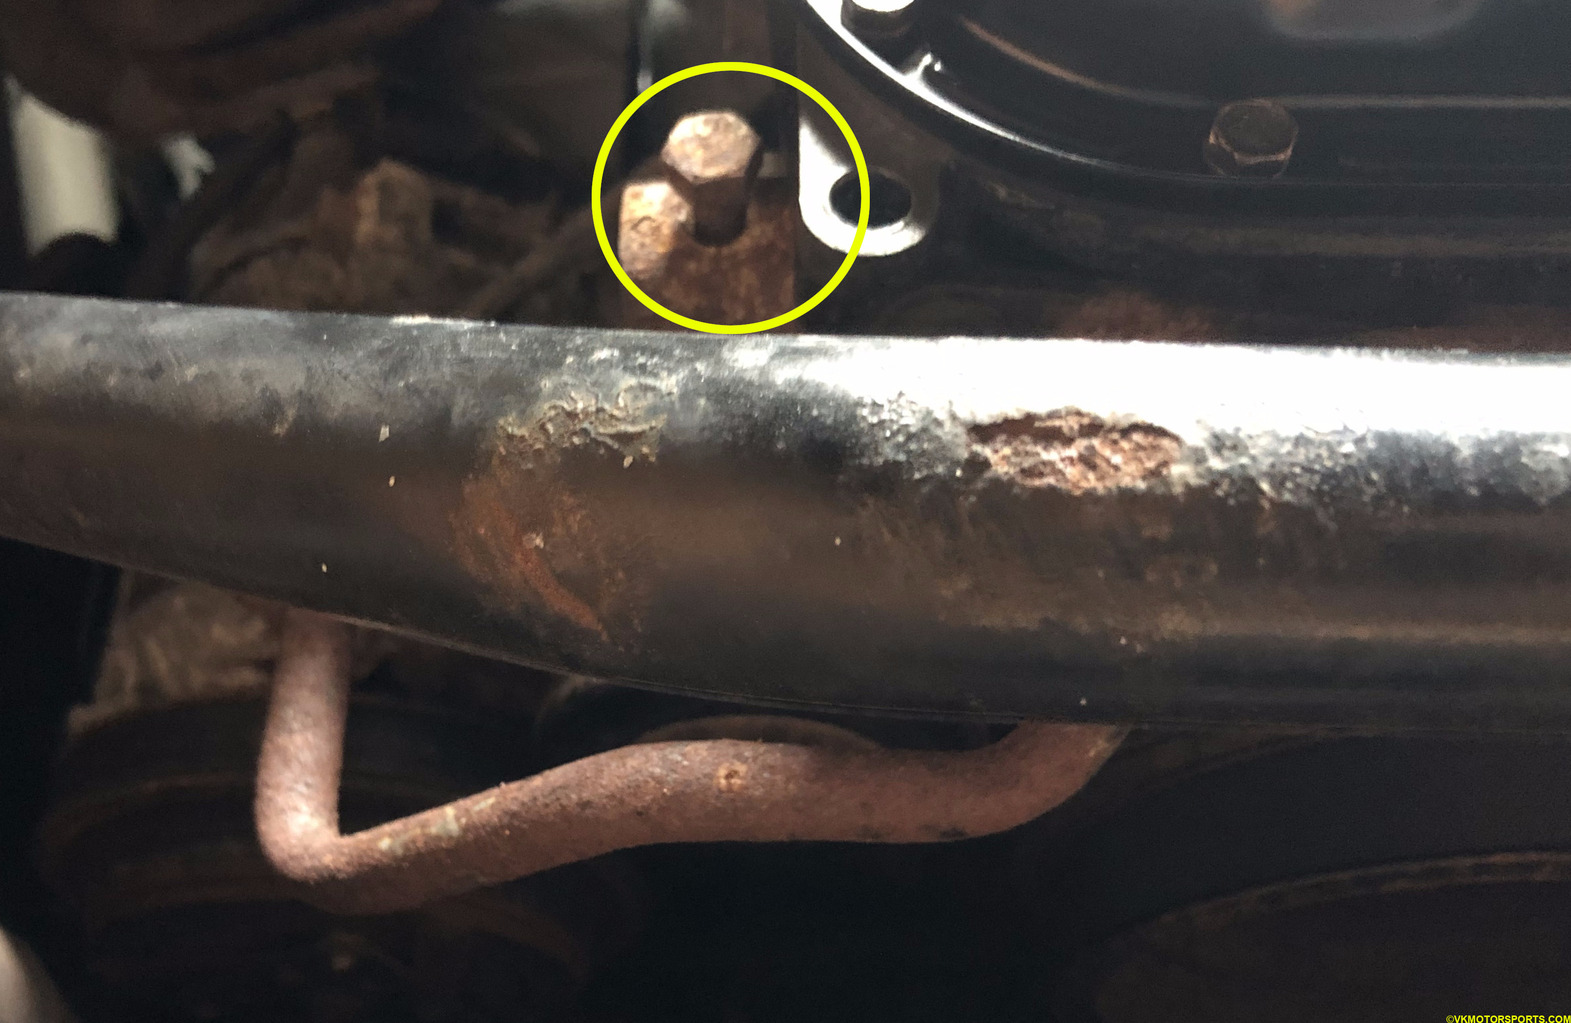 Figure 13. AC Pulley adjuster bolt view from below
Step 7: Using a socket extension and a 14mm socket, loosen the pulley nut C similar to Step 4, as shown in Figure 14. Remember to maintain the orientation of the washers.
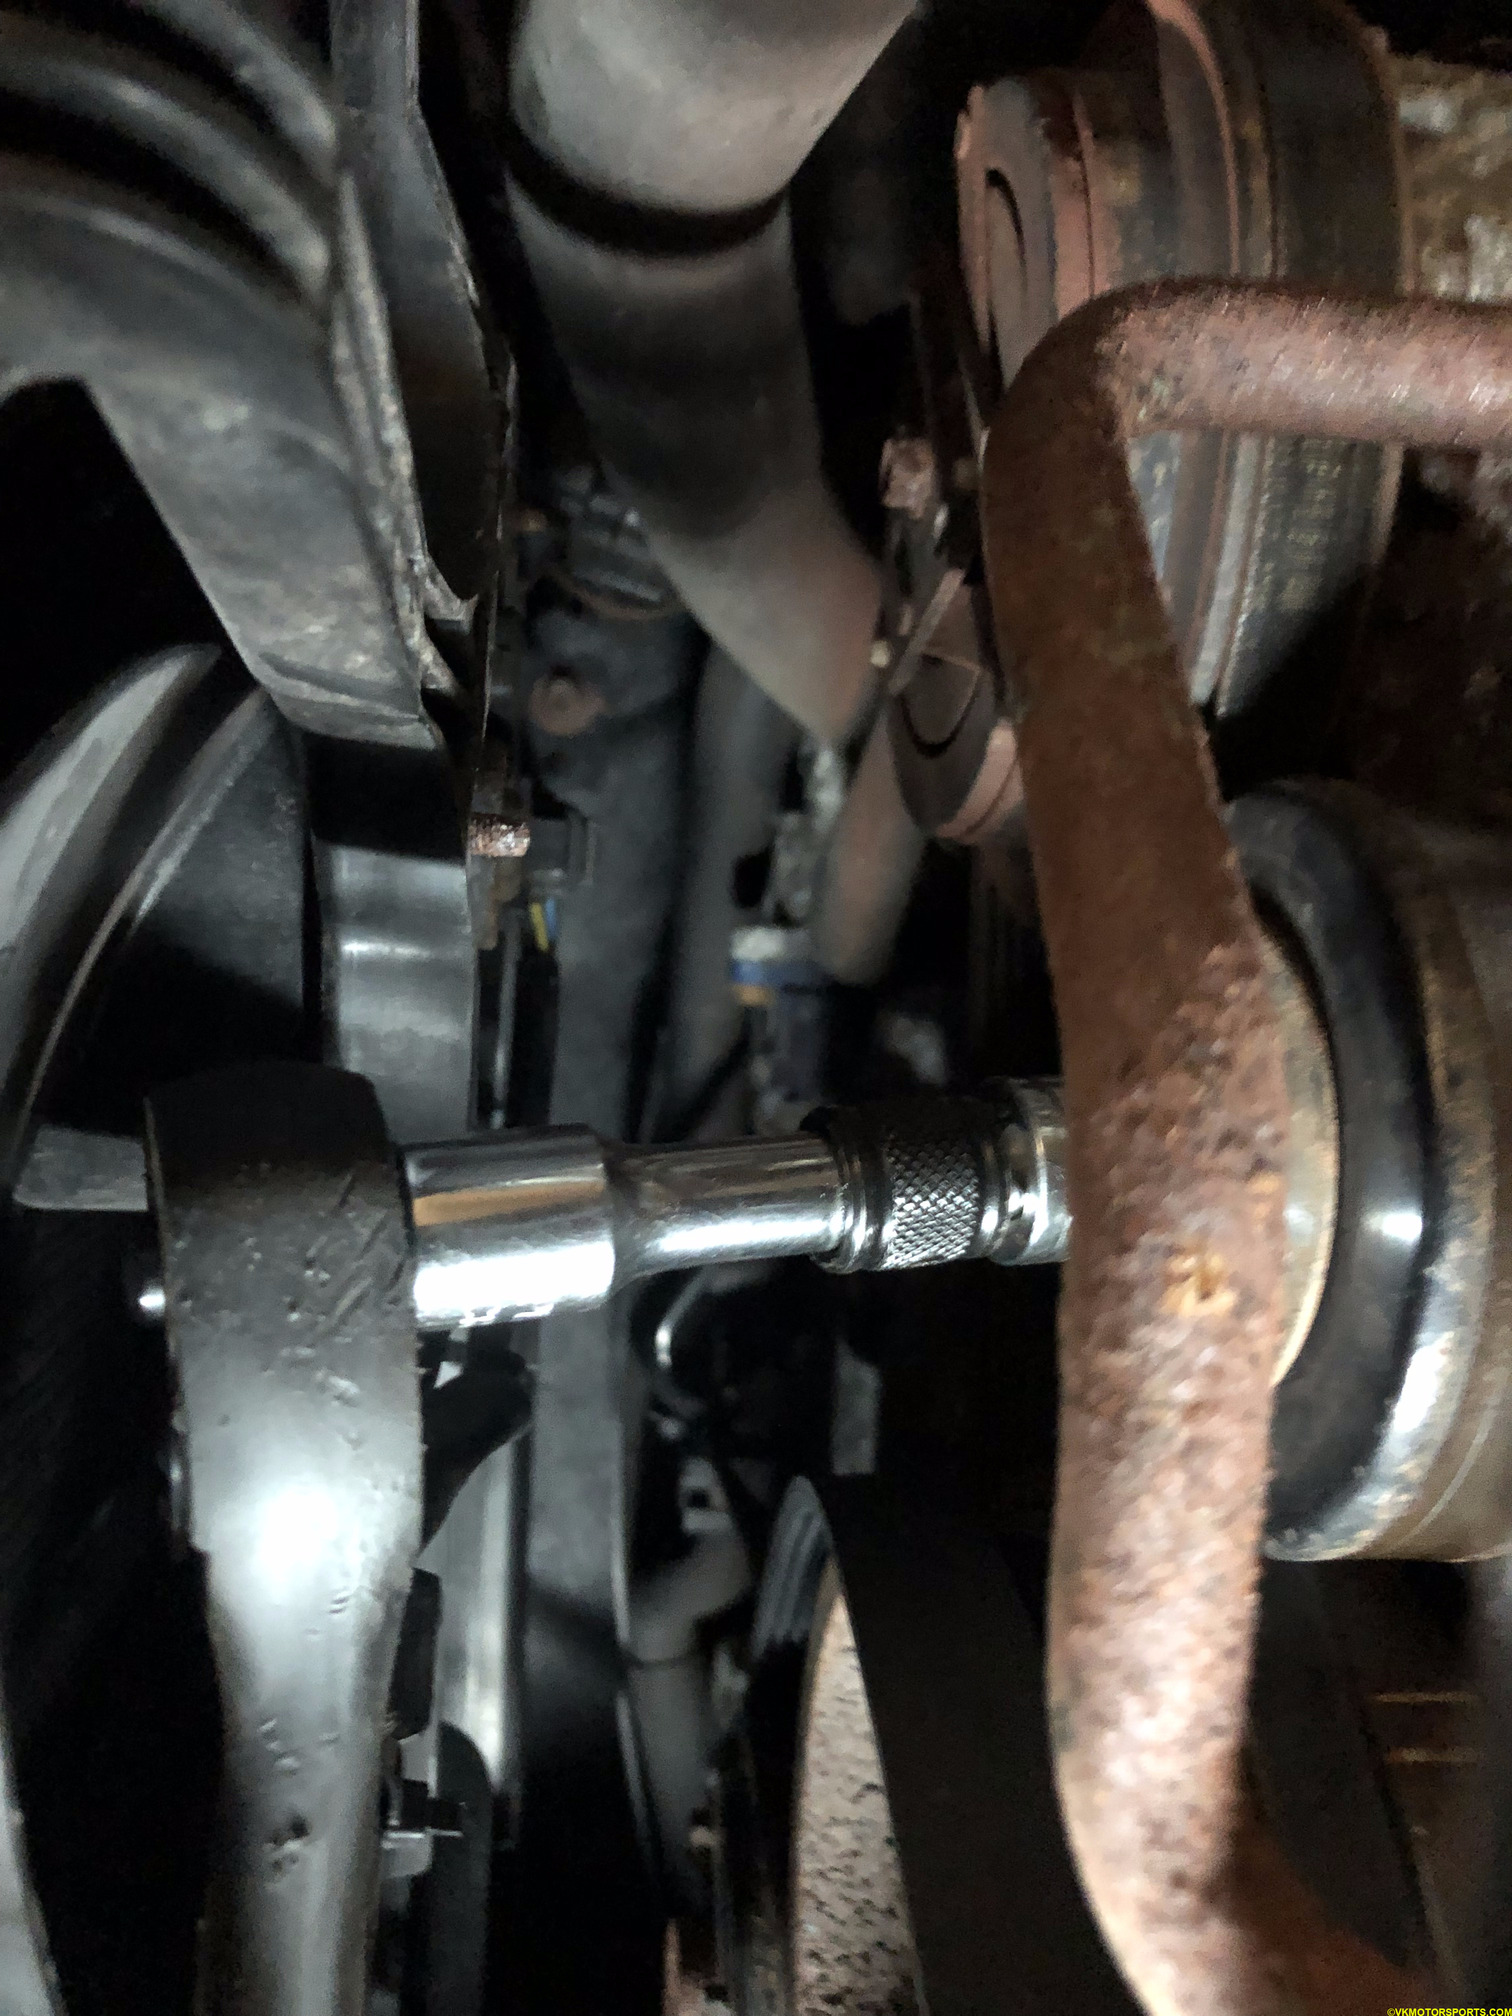 Figure 14. Using socket extension to loosen nut for AC idler pulley
We are going to use Gates 36321 for the replacement idler pulley as shown in Figure 15.
 Figure 15. New and old AC idler pulleys
To get the old pulley off, you have to also loosen the adjuster bolt in Figure 13, but mine was so rusted that it broke while turning as seen in Figure 16. I had to then buy replacements.
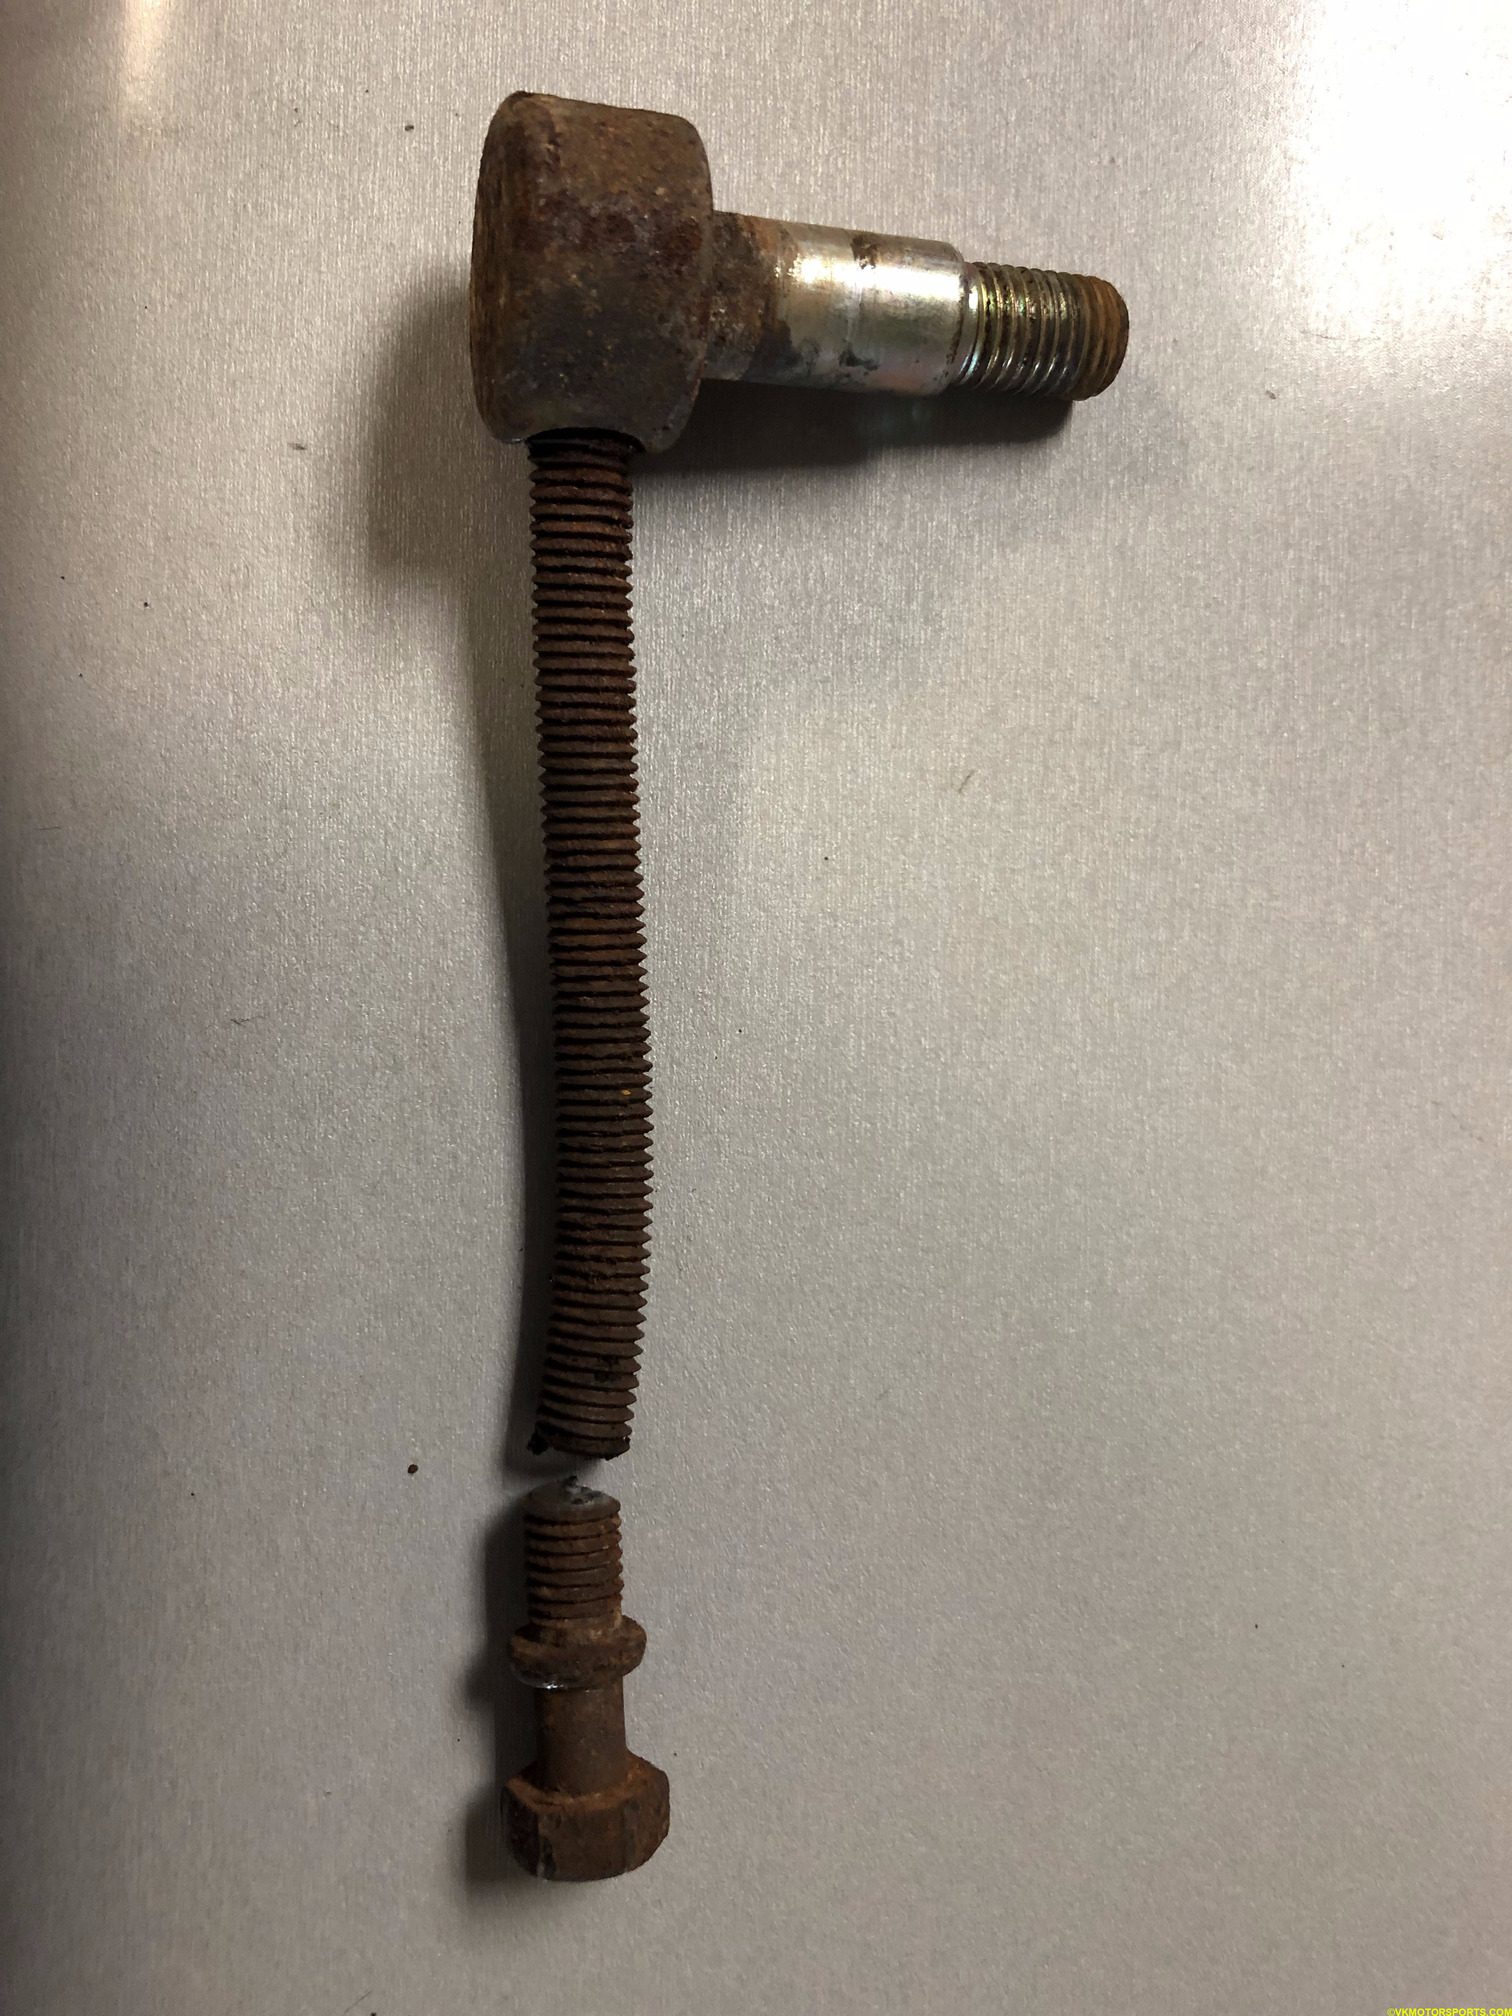 Figure 16. Broken adjuster bolt
Step 8: I bought replacement adjuster bolt and pulley shaft from an Infiniti dealership for about $80 as shown in Figures 17 and 19. Figure 18 shows the breakdown of the pulley shaft unit and the orientation of the washers along with the part numbers required.
The part number for the adjuster bolt is 11948-AL50A and for the pulley shaft is 11928-AL50A, as shown in Figure 19.
 Figure 17. New adjuster bolt
 11948-AL50A
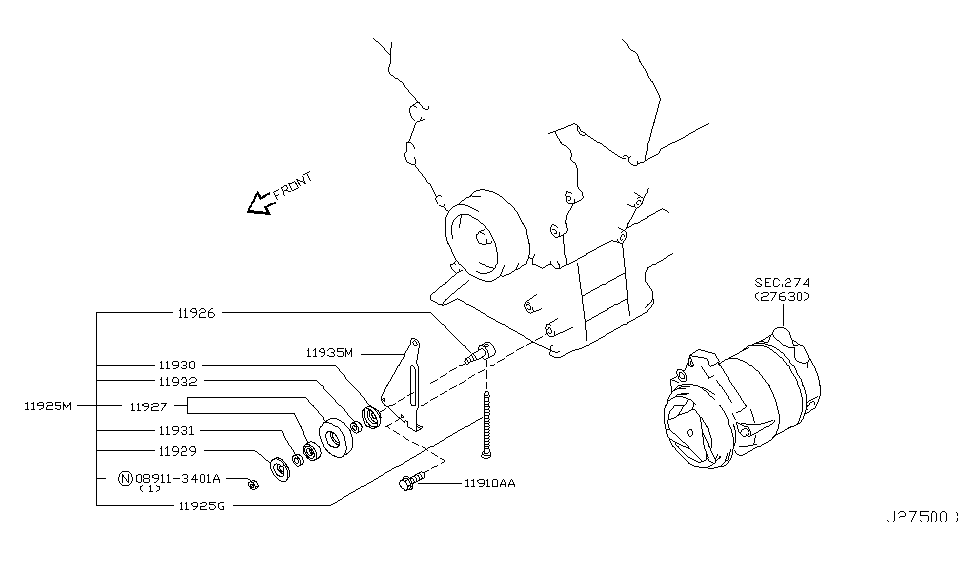 Figure 18. Breakdown of the pulley shaft with part numbers
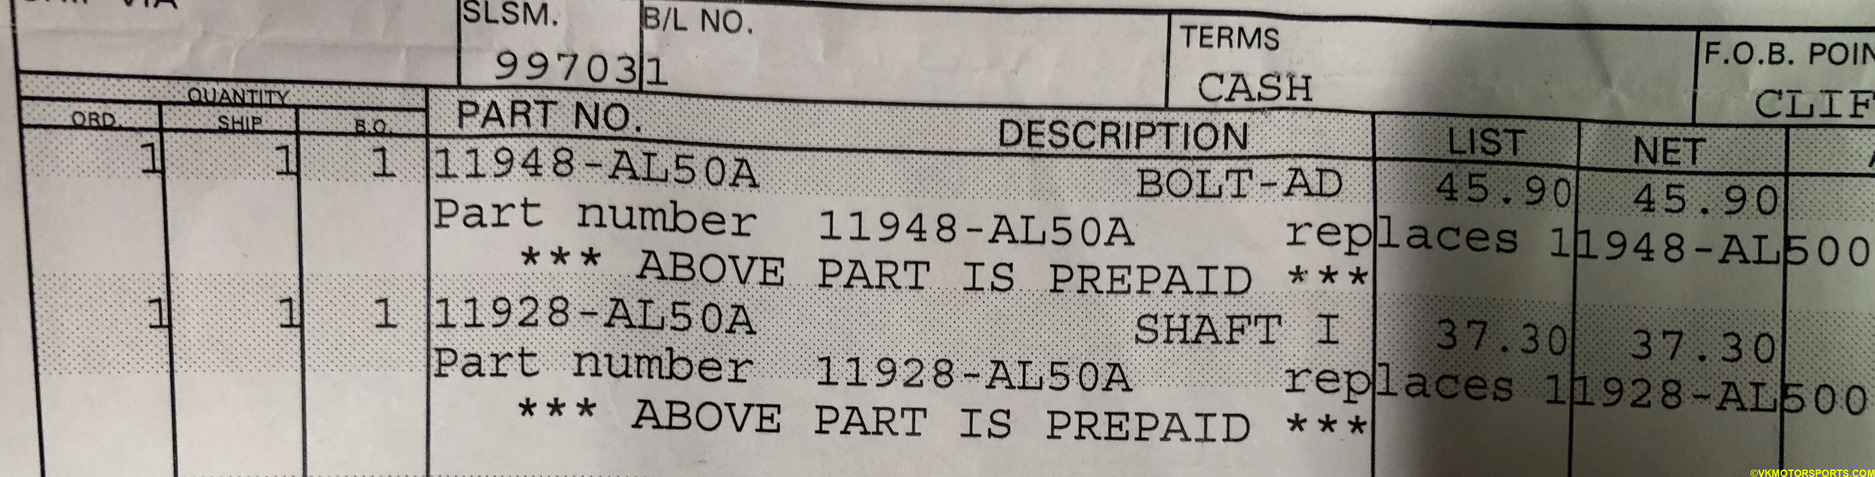 Figure 19. Receipt of the parts
Step 9: Now we are ready to replace the old shaft and adjuster bolt with the new ones. Figure 20 is me testing out the new parts on the new pulley and making sure they will fit correctly, and that the adjuster bolt moves in and out of the shaft part.
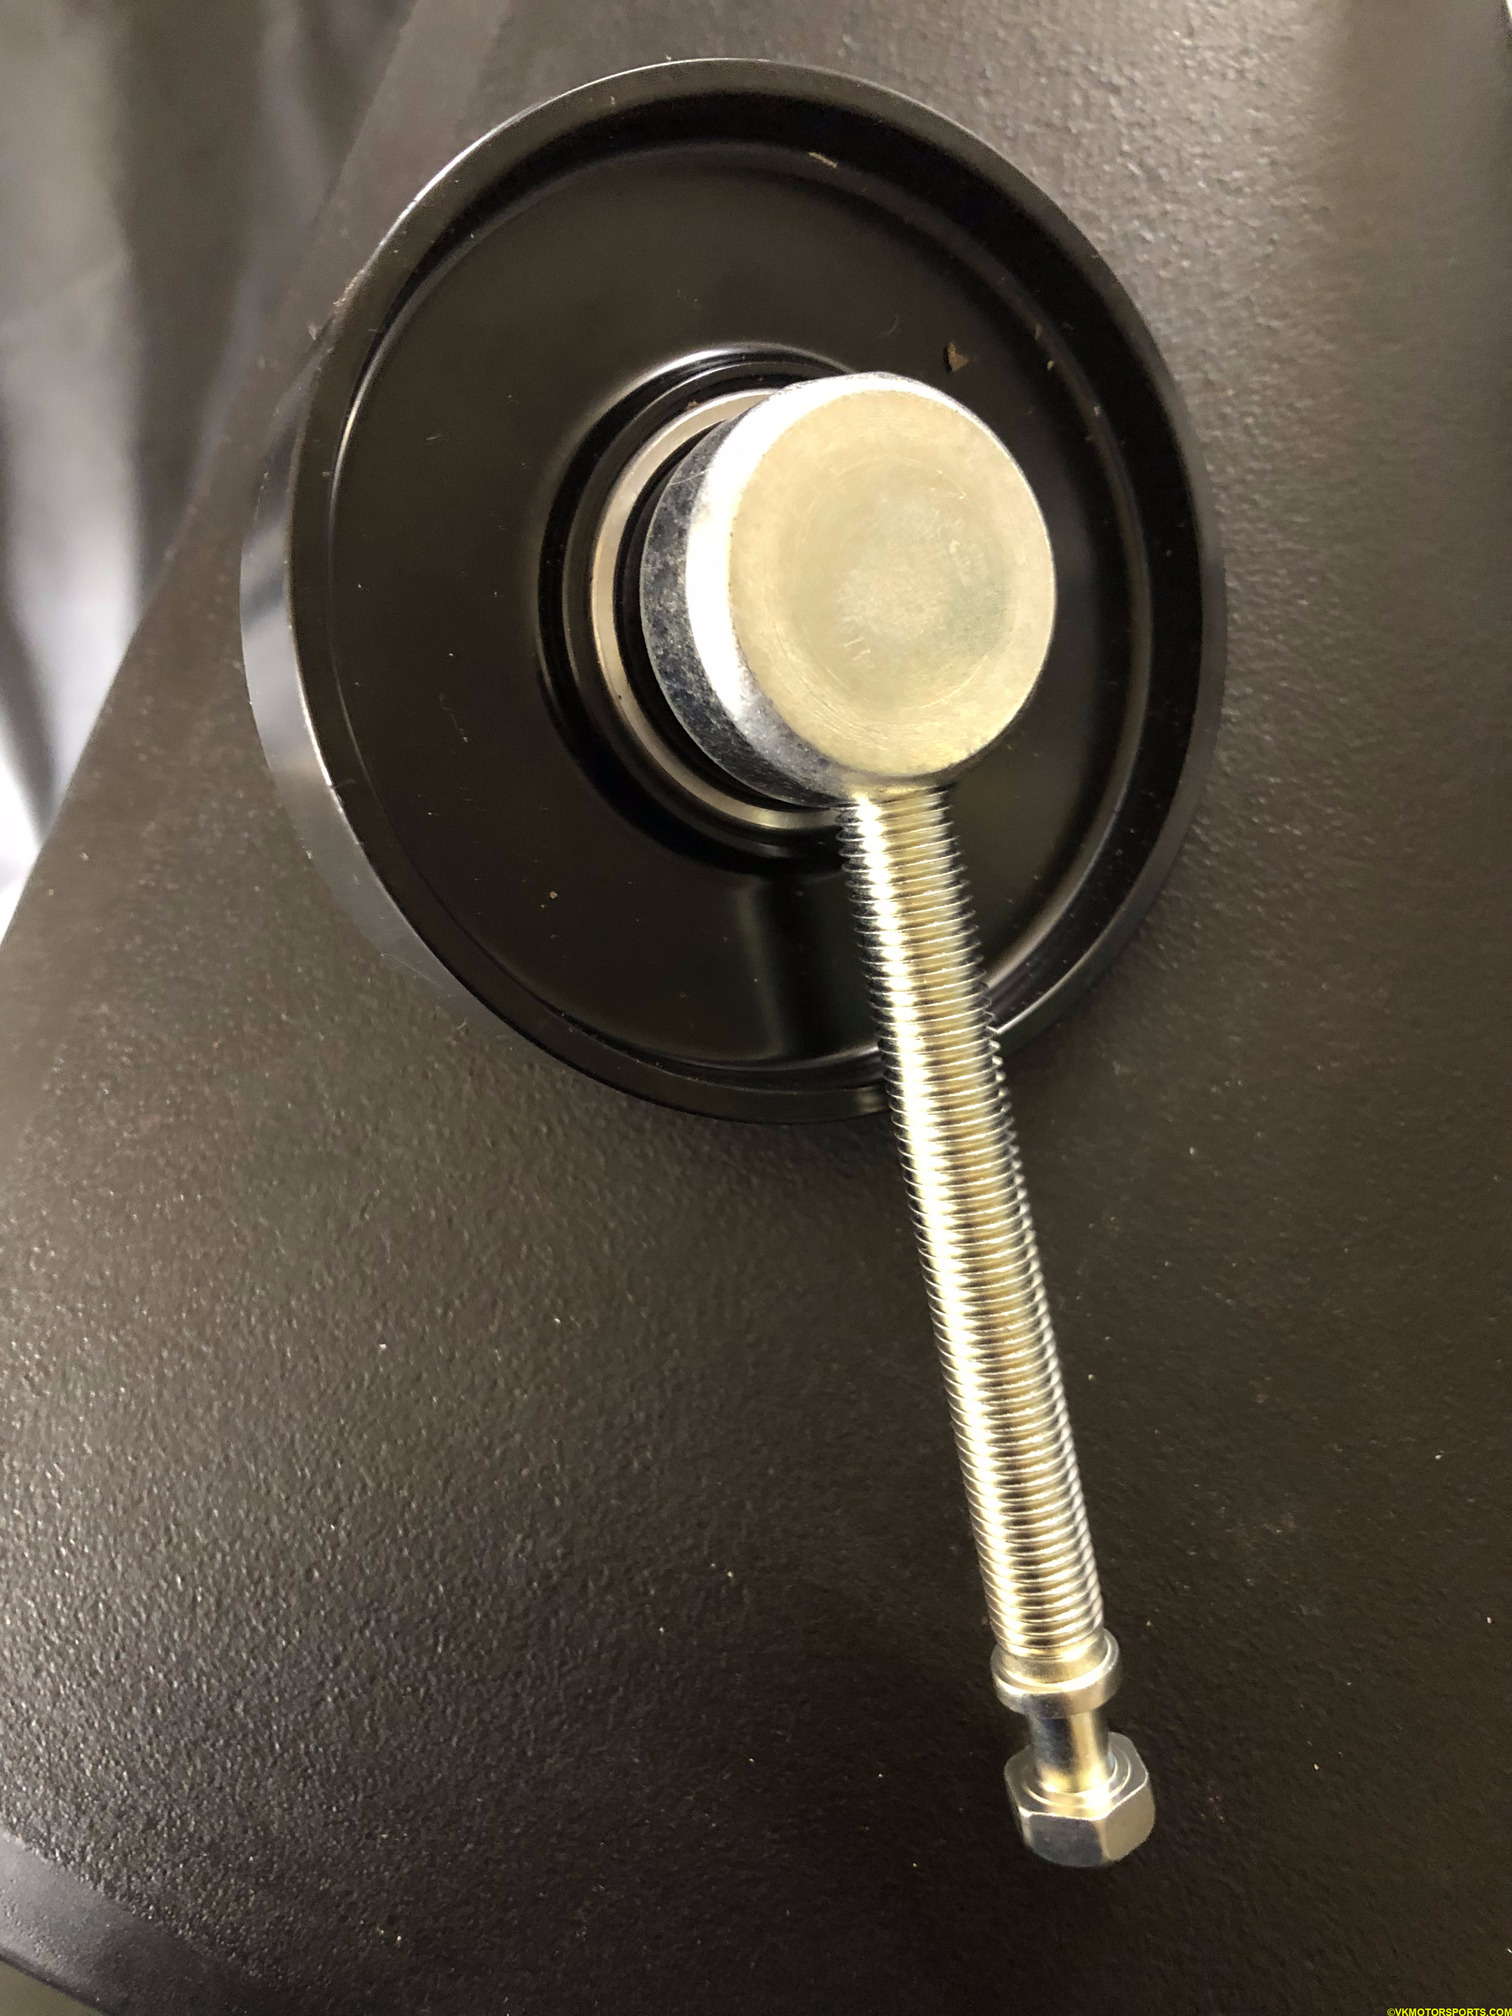 Figure 20. New pulley, adjuster bolt and shaft
Step 10: Figure 21 shows how the shaft and adjuster bolt fit into the existing bracket. The shaft has to be inserted first protruding out of the hole marked by the yellow arrow, and the adjuster bolt has to be inserted from the bottom marked by the yellow square. The adjuster bolt will then use the rear part of the shaft as a nut and hold it on the bracket.
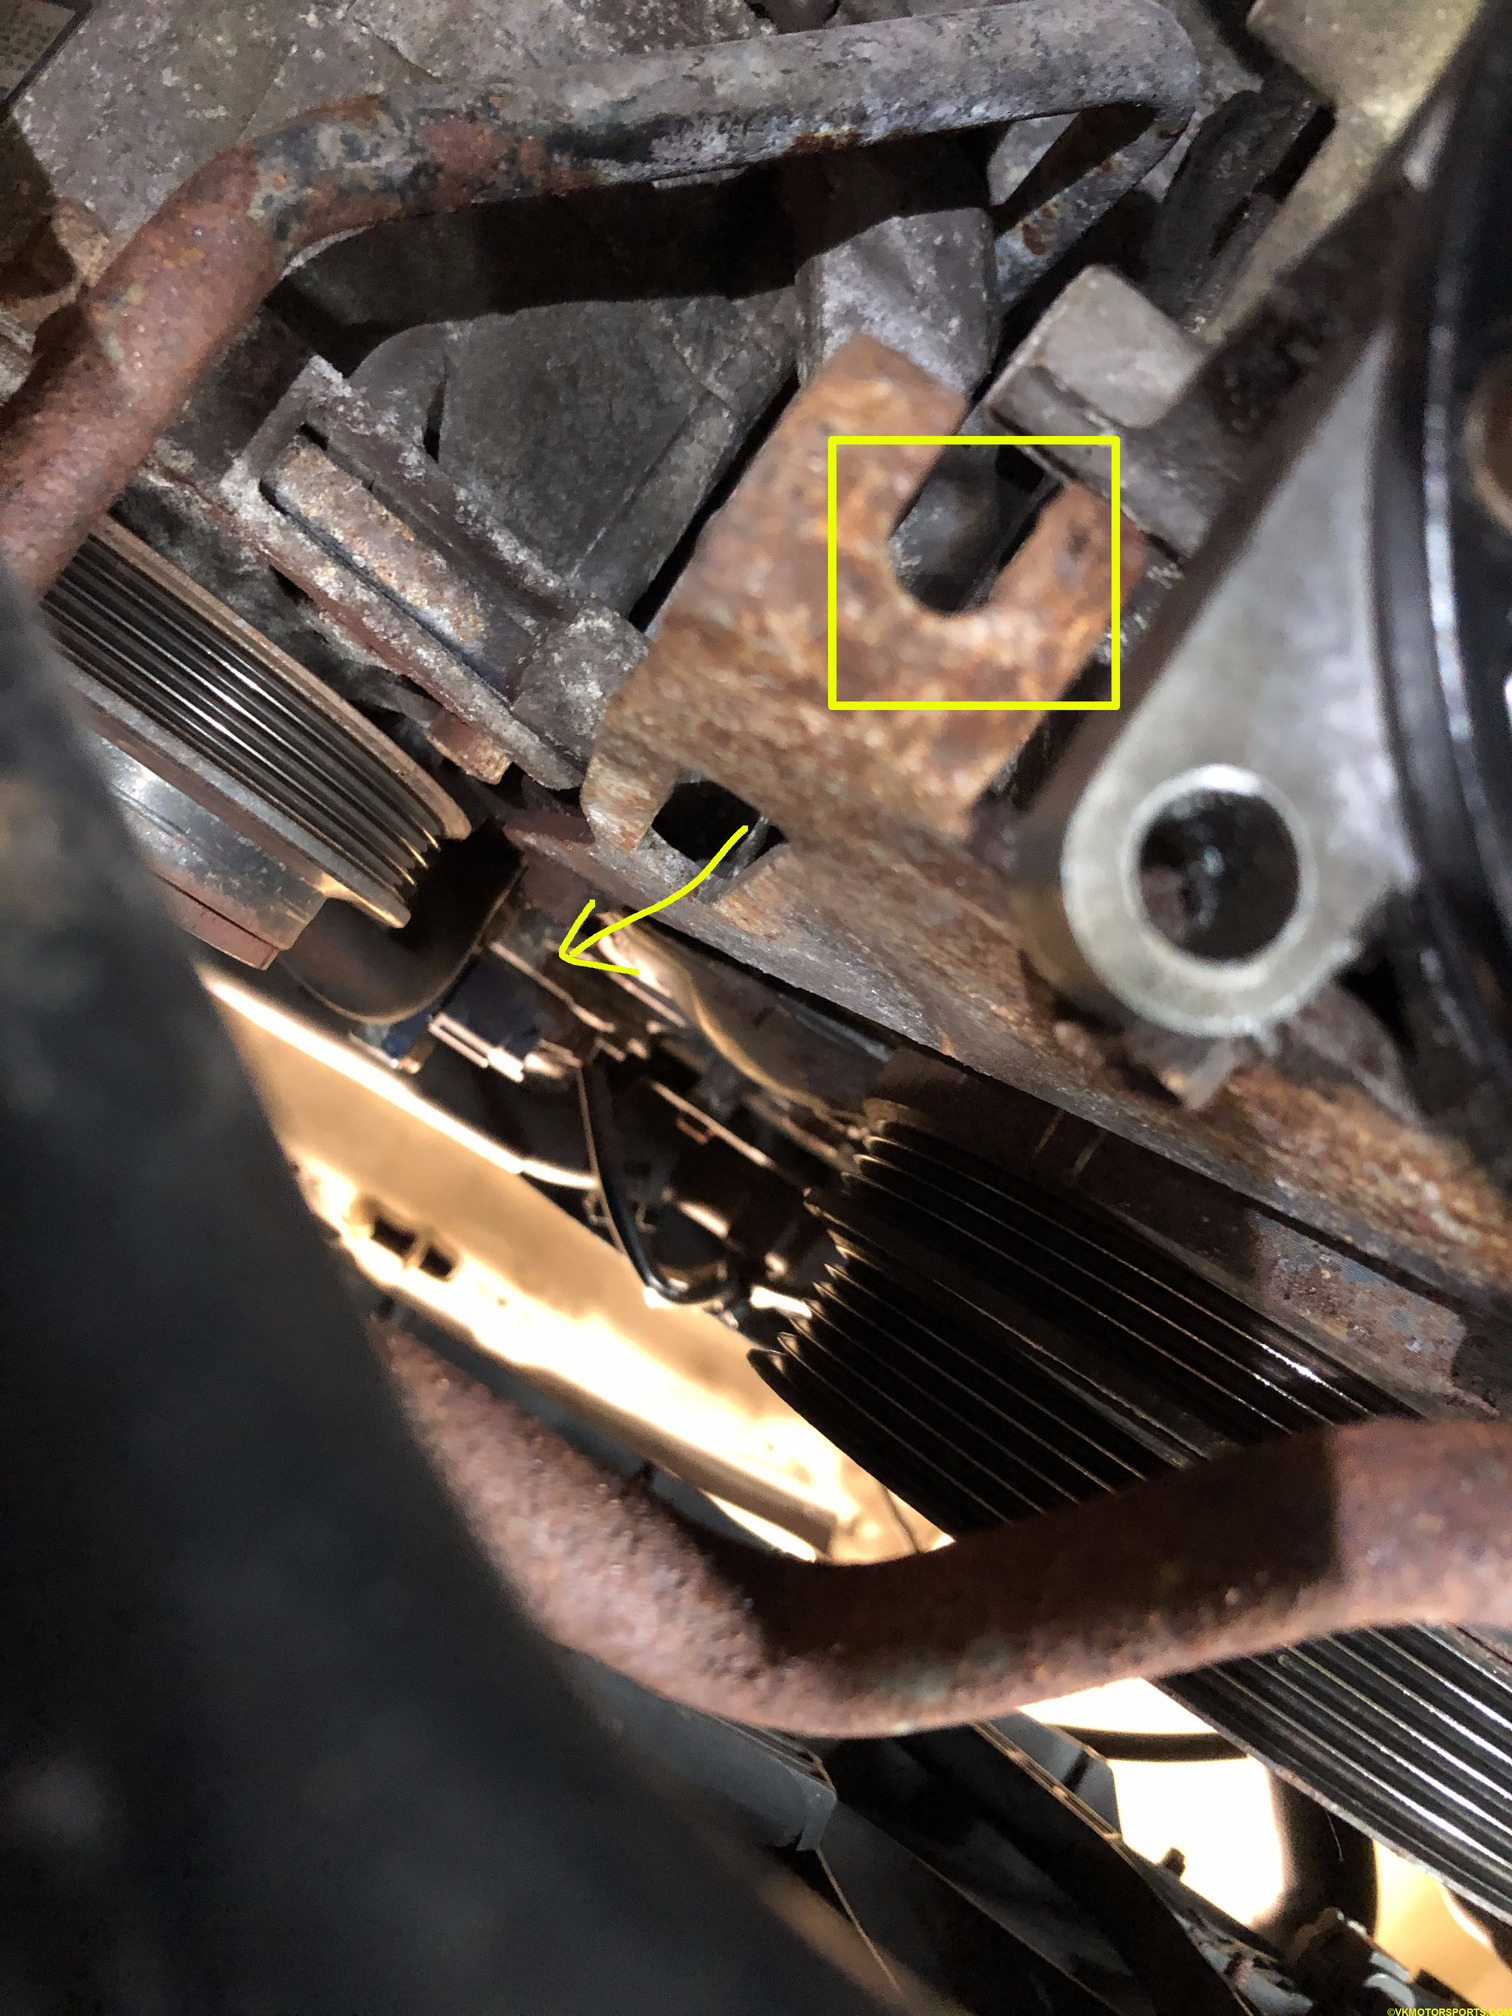 Figure 21. Locations of the AC idler pulley shaft and adjuster bolt
Step 11: Once you have the shaft and adjuster bolt installed, install the idler pulley and all the washers in the same order as they were. Keep the idler pulley nut a little loose until you install the belts.
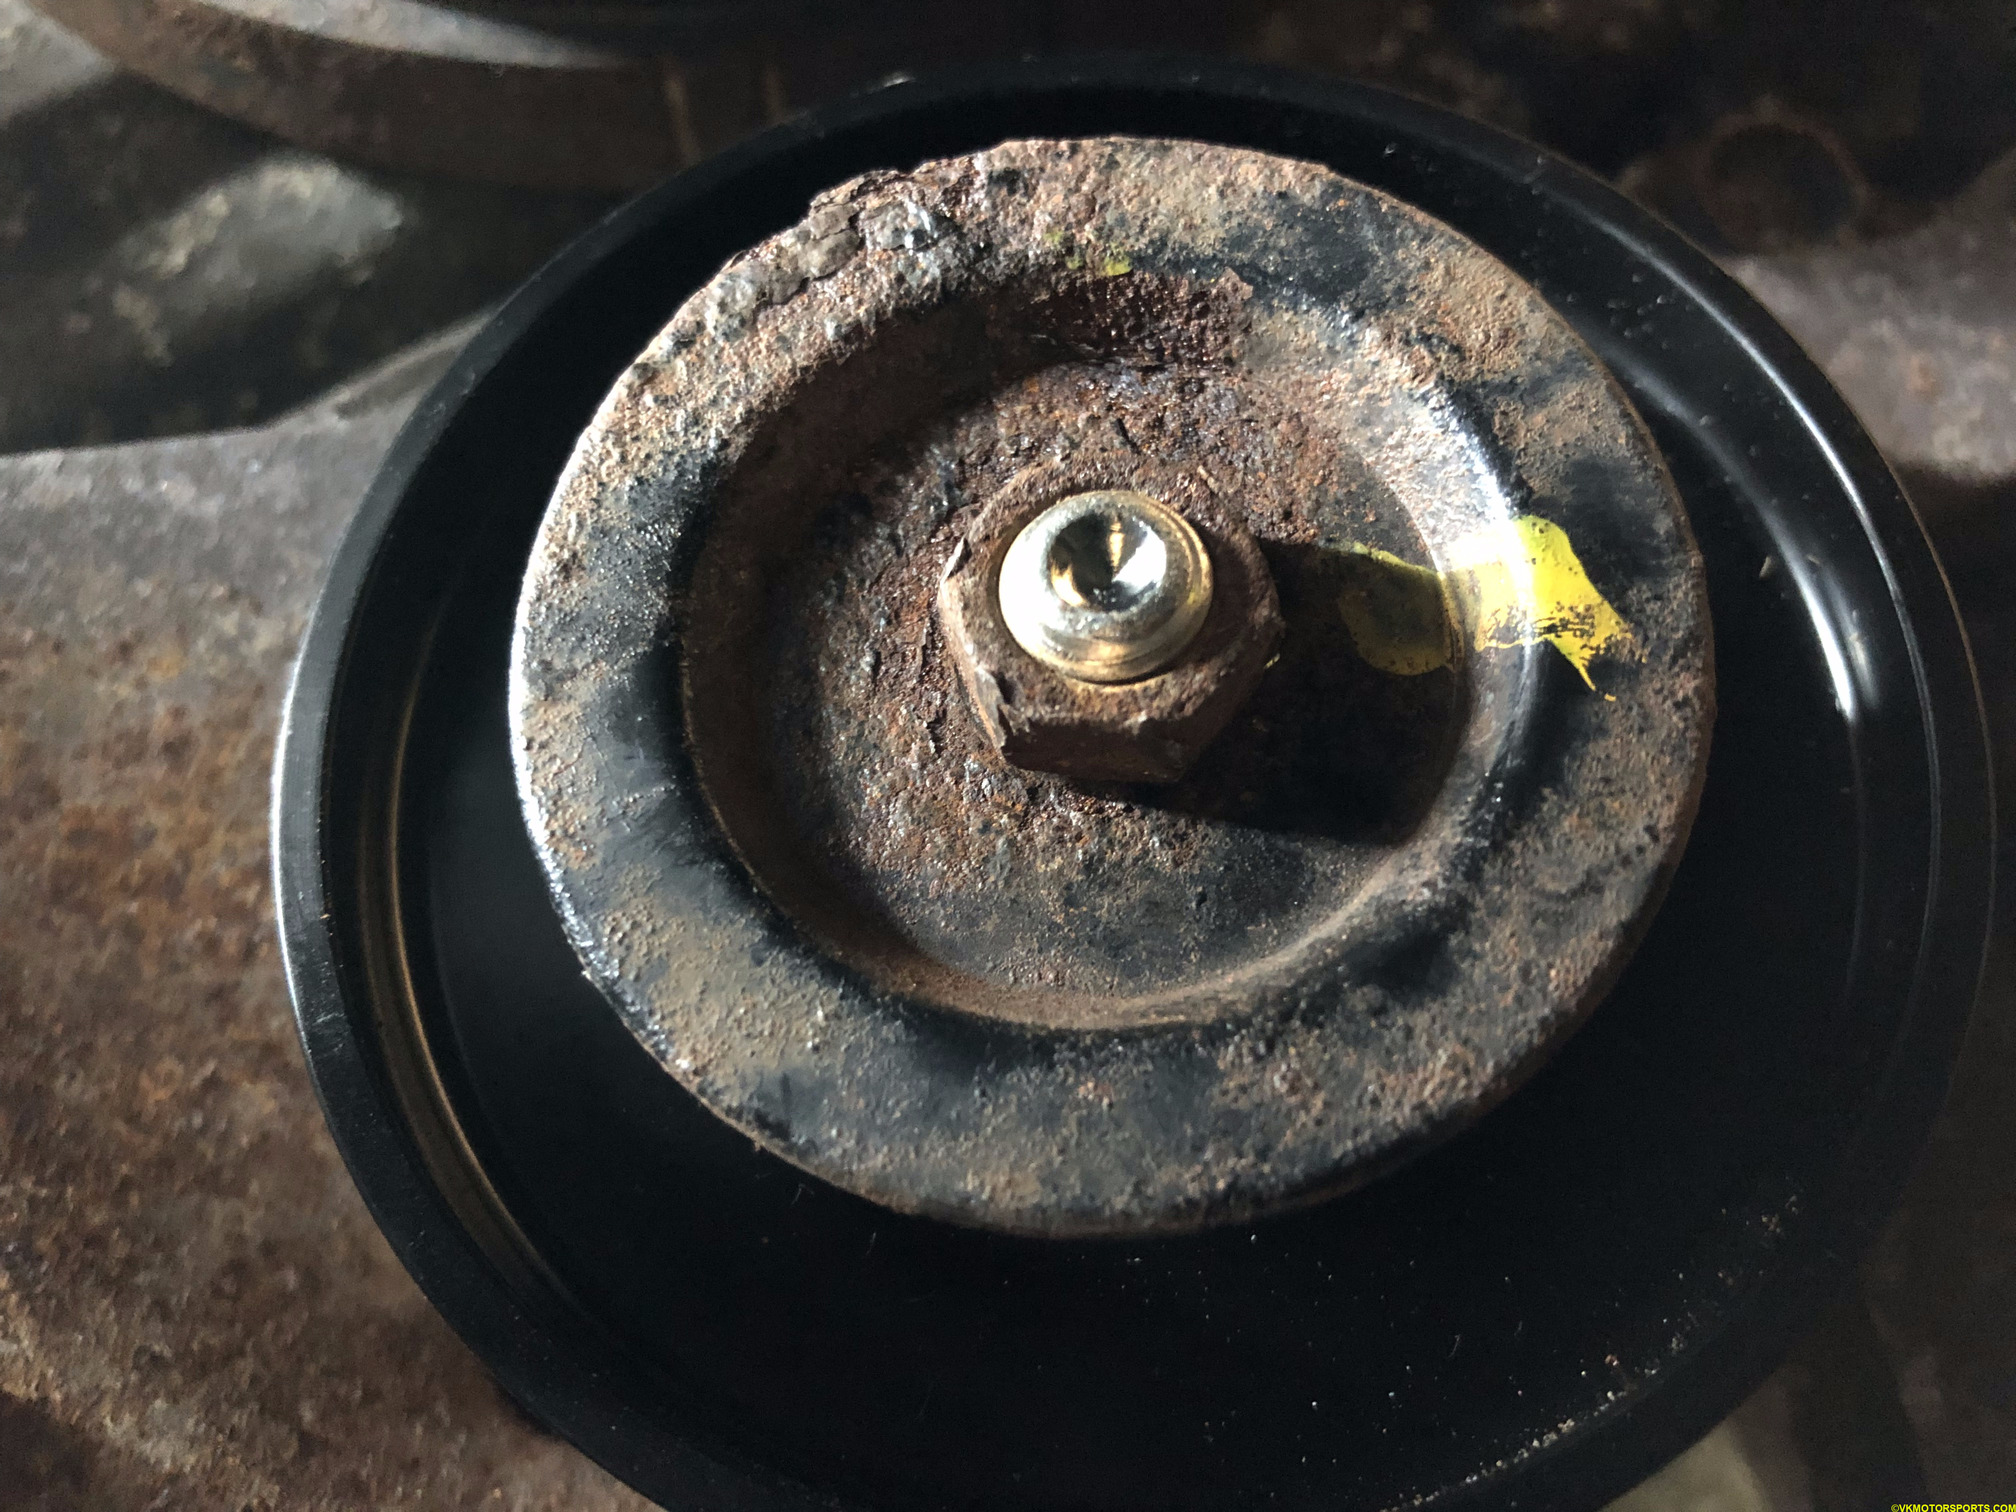 Figure 22. AC Idler pulley installed
AC DRIVE BELT REPLACEMENT
Step 12: The first belt to be installed is the AC drive belt, since it sits behind the main drive belt. Using the Figure 1 diagram, install the belt (Figure 23) on the pulleys such that the grooves match up. To get the belt to fit you will need to loosen both the nut C (Figure 1) and the adjuster bolt D until the pulley is able to slide under the belt and then start tightening the belt in place. To tighten the belt you have to just tighten the adjuster bolt (Figure 24).
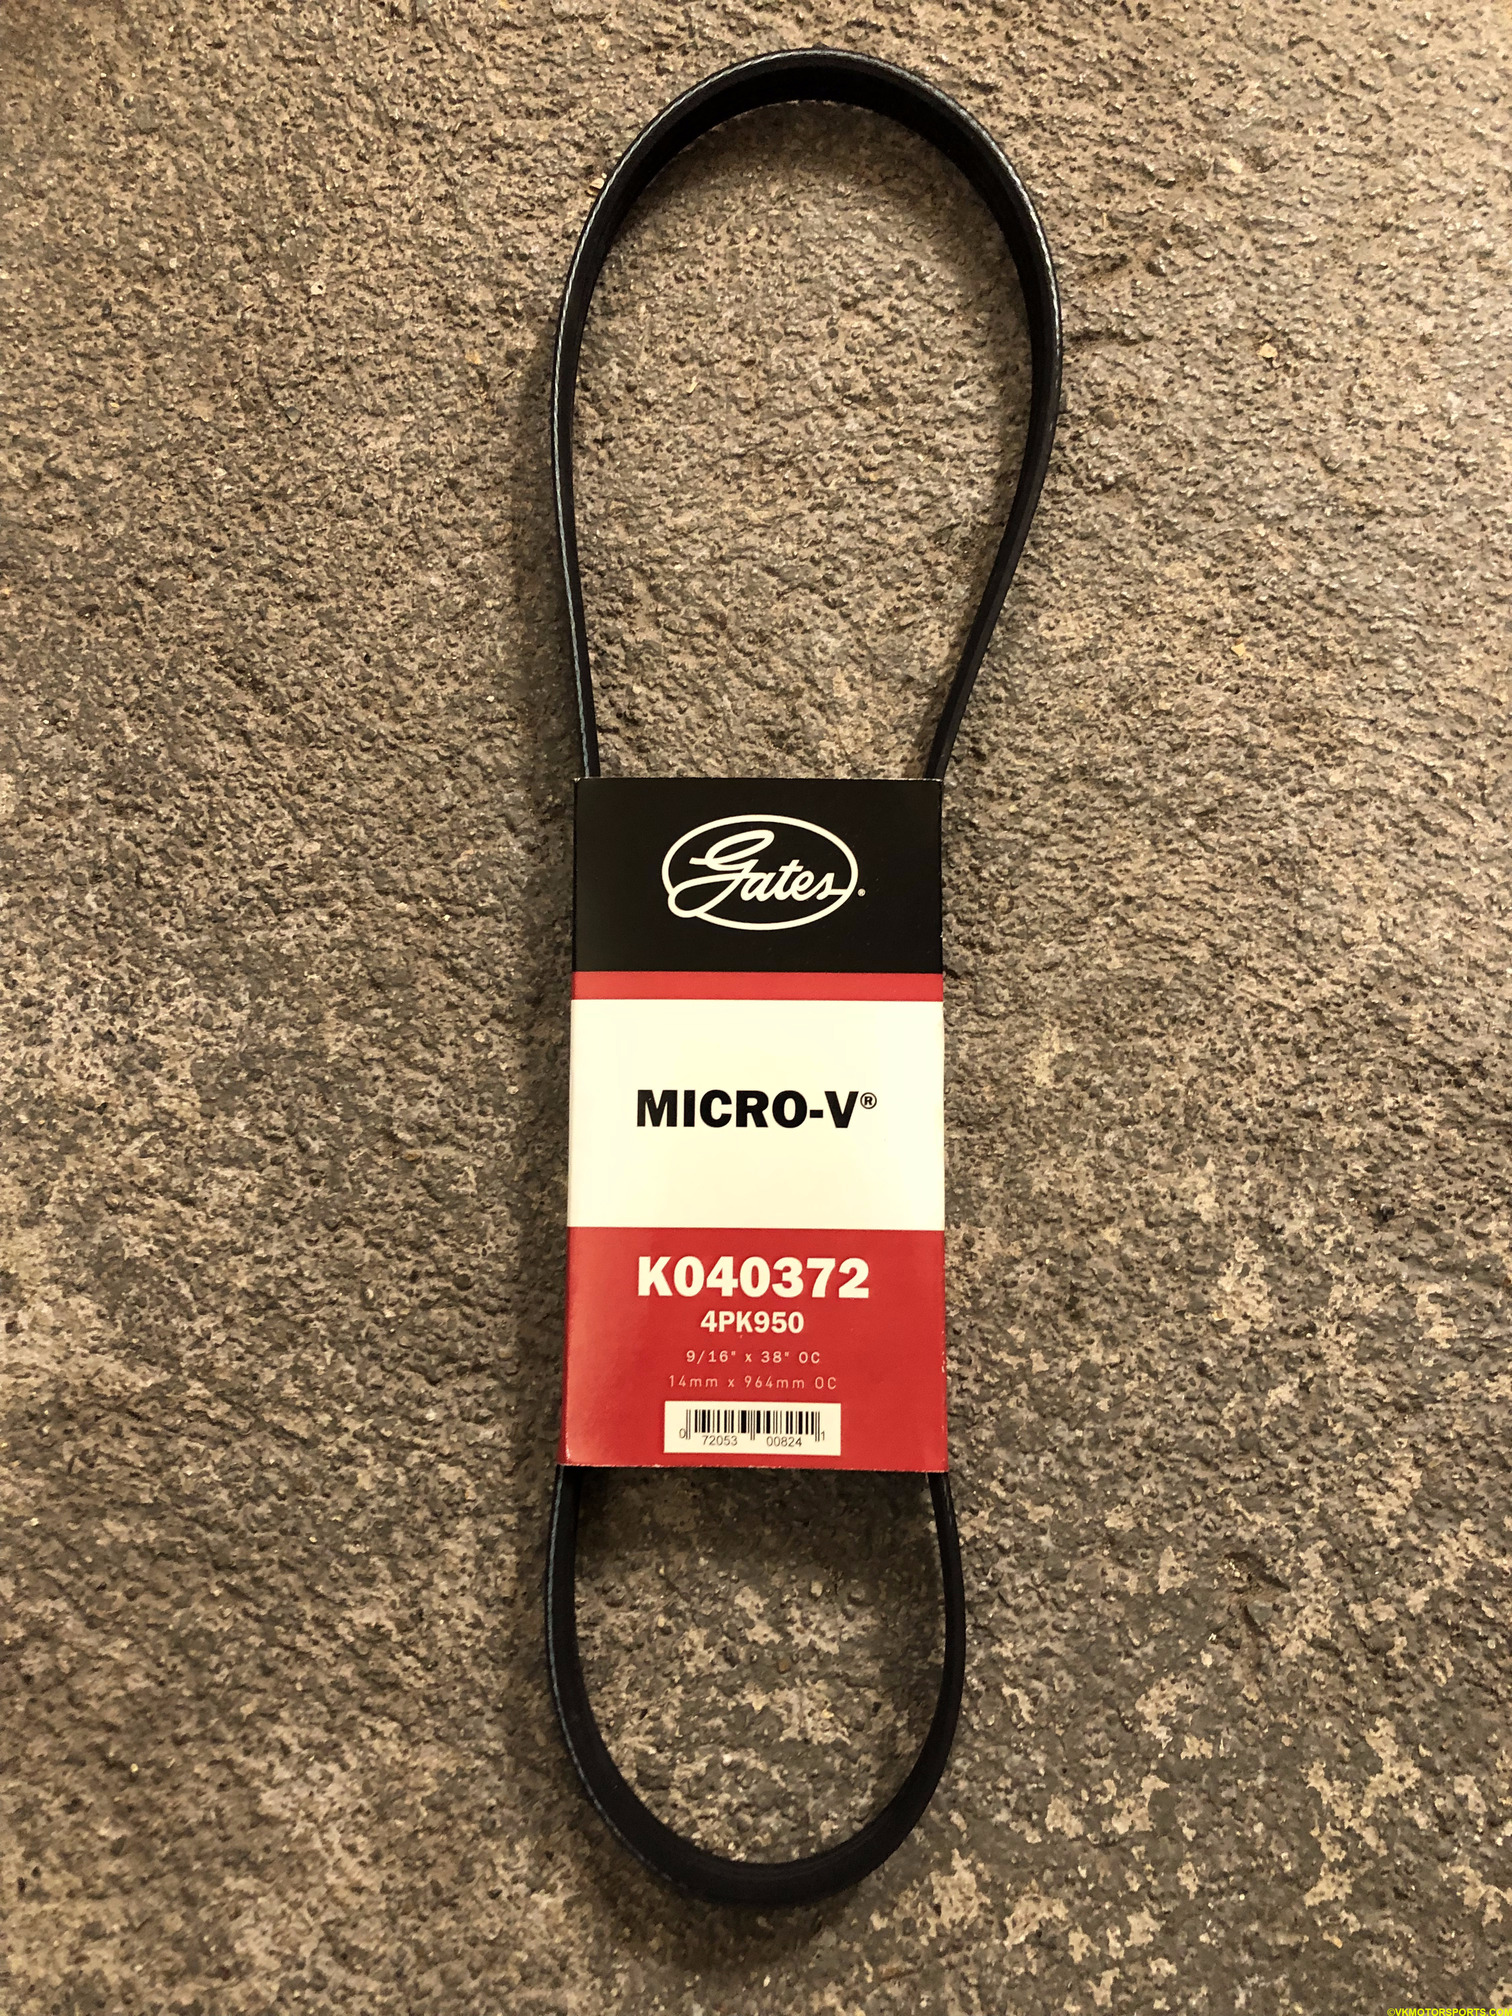 Figure 23. Gates K040372 belt for the AC drive
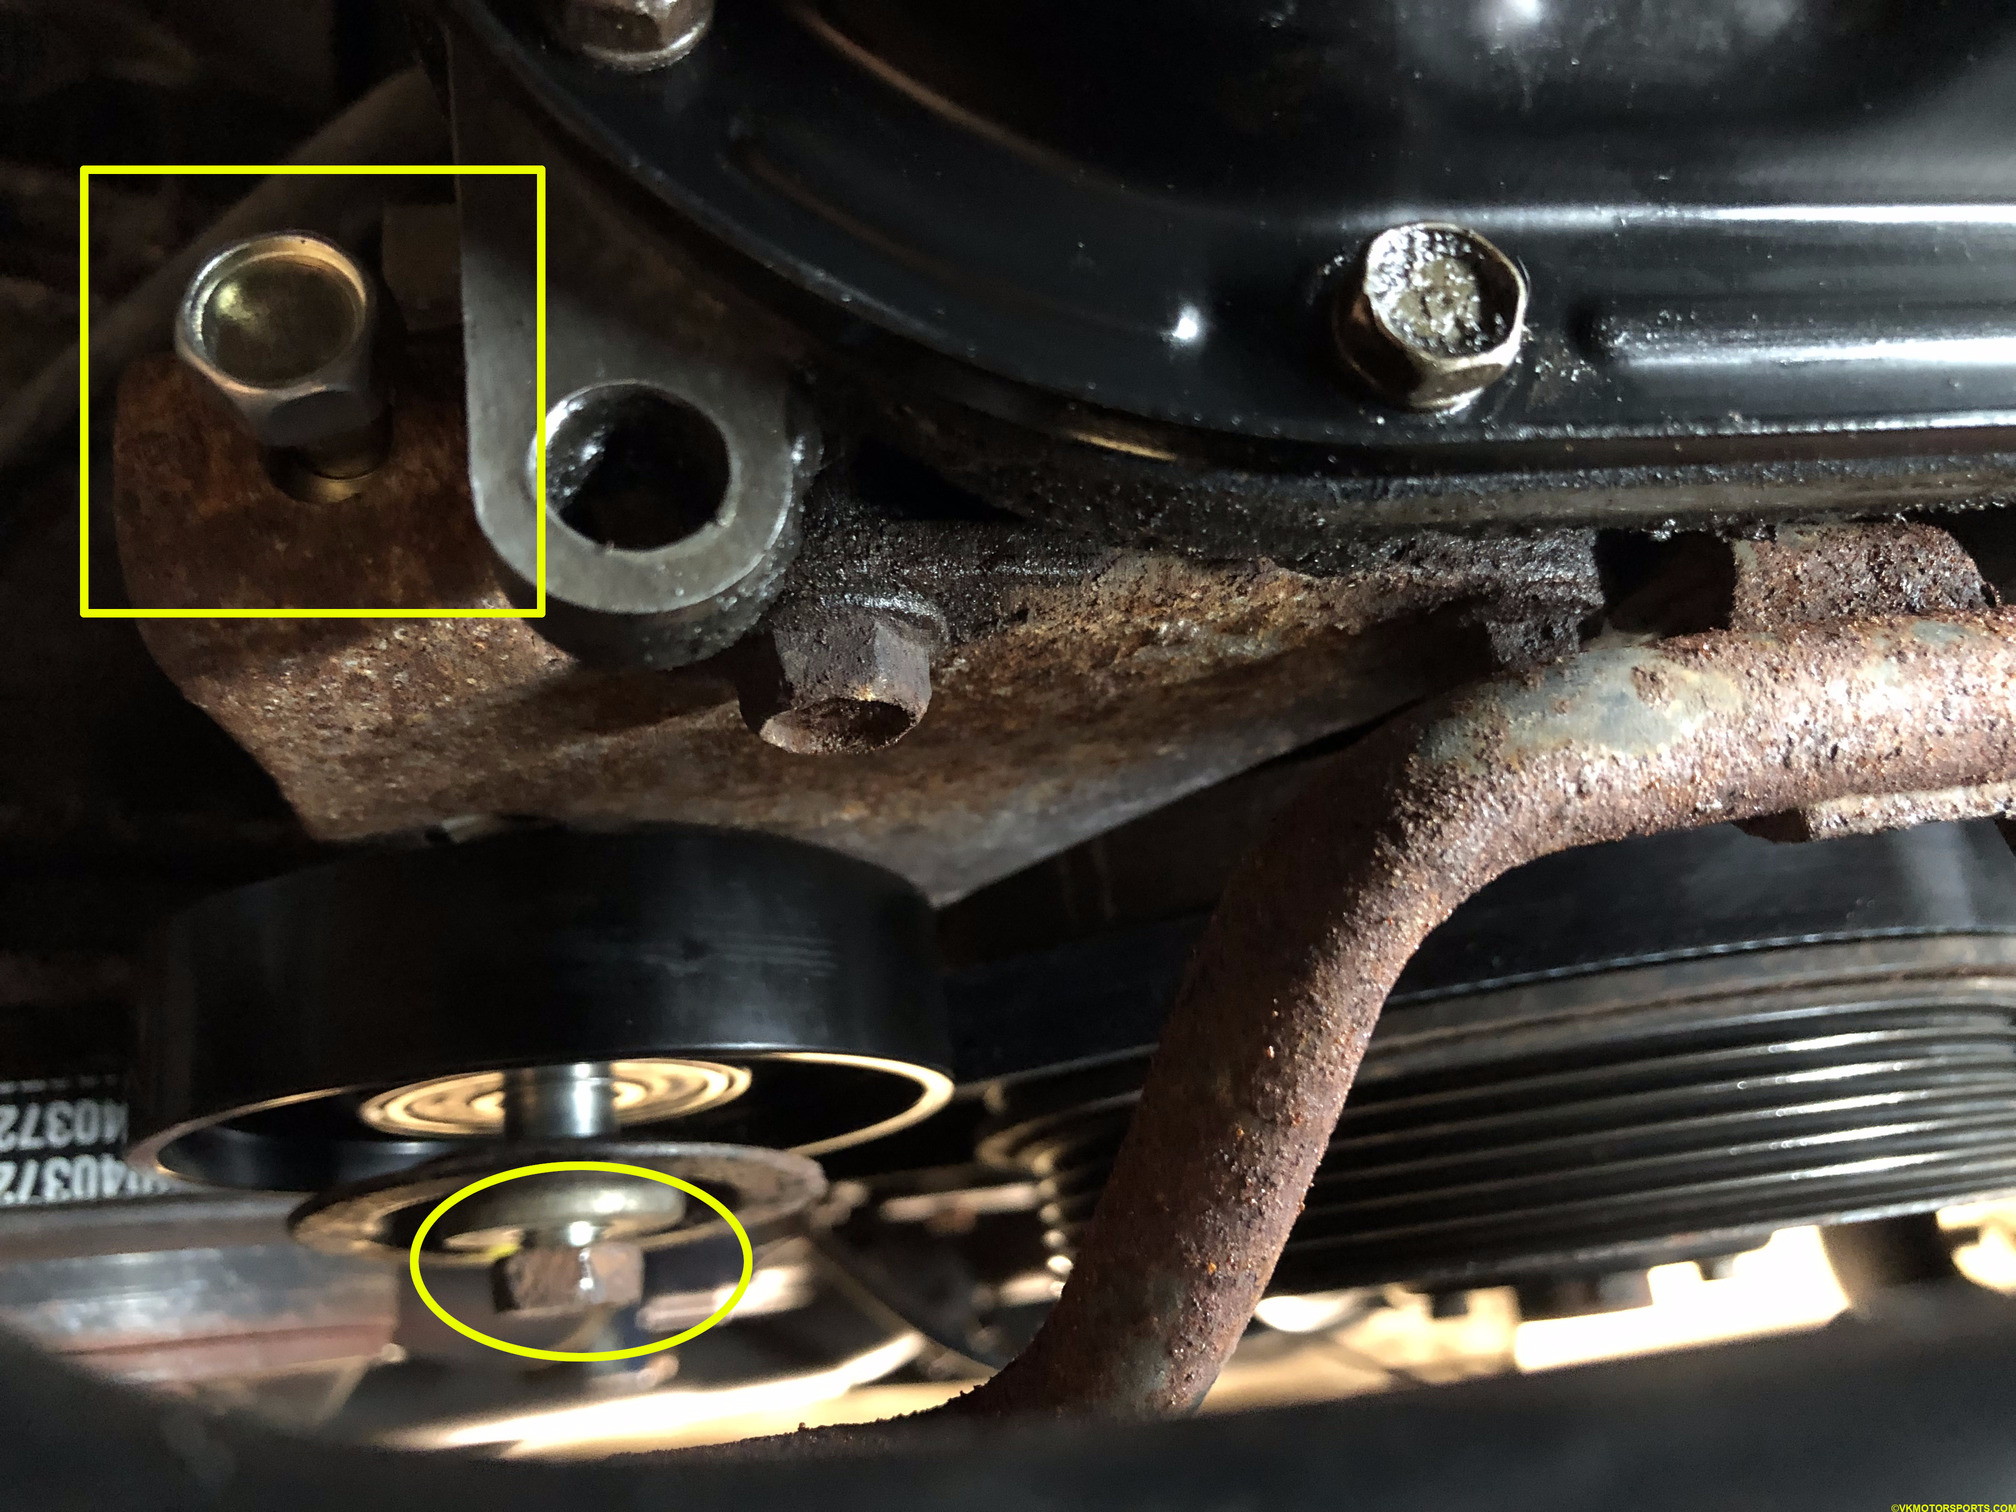 Figure 24. AC idler pulley adjuster bolt
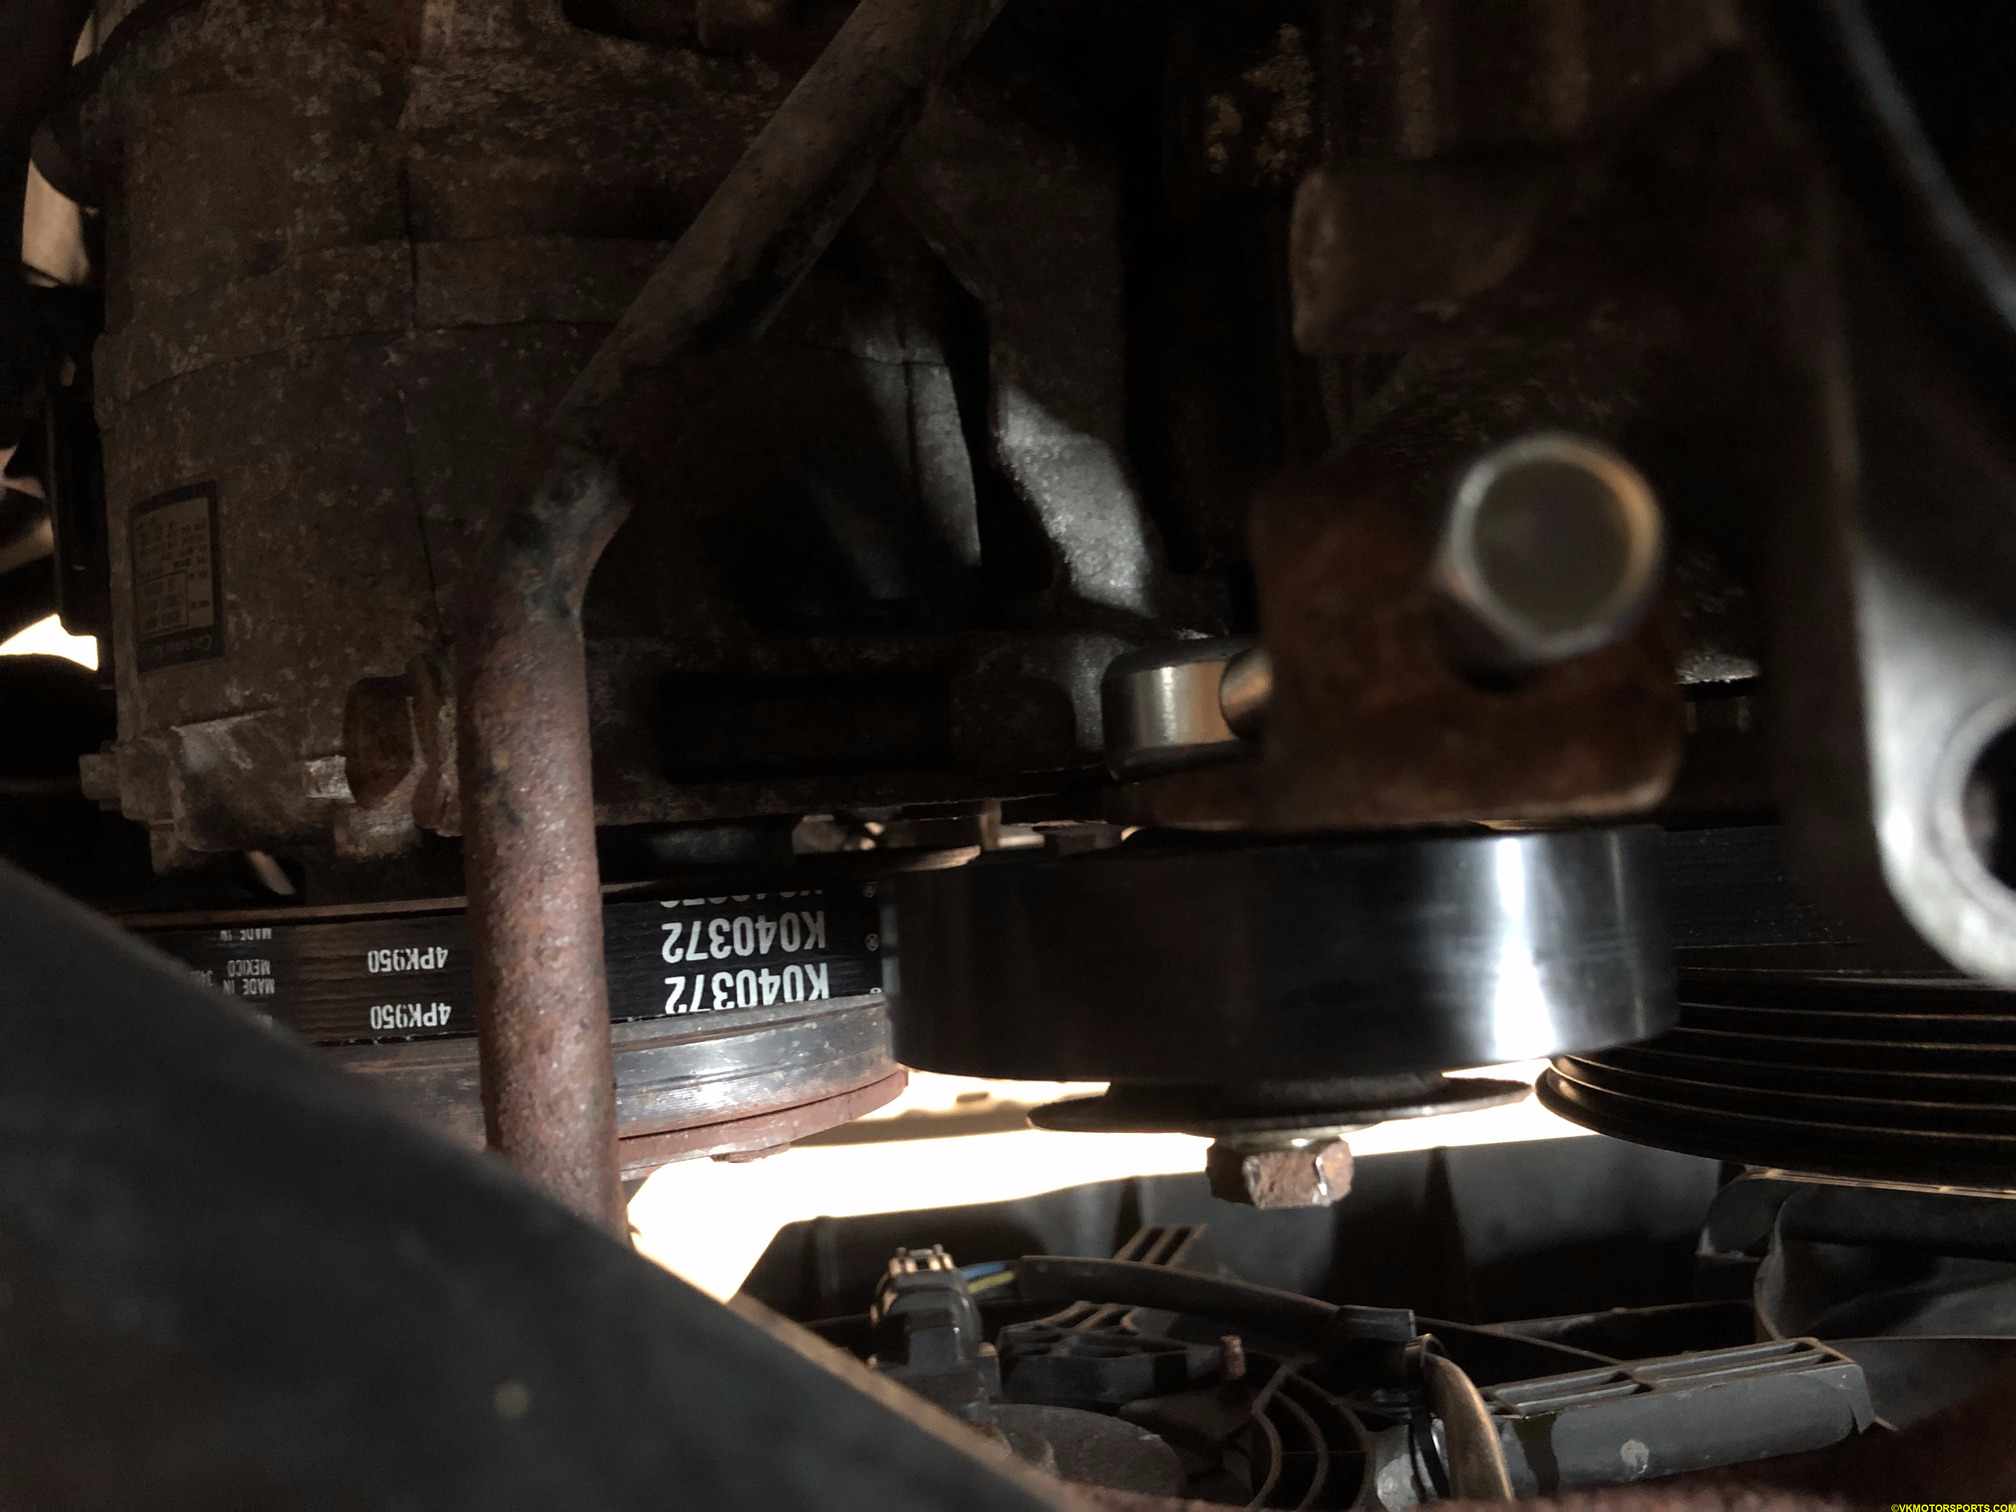 Figure 25. AC drive belt has been installed
The AC drive belt has been installed.
MAIN DRIVE BELT REPLACEMENT
Step 13: Installing the main drive belt is a similar process to the AC drive belt. You have to make sure the new belt (Figure 26) is looped around the pulleys as in Figure 1. You will need to loosen the nuts A and B to allow for the idler pulley to slide under the belt in place. Figure 27 shows the belt has been installed and the nut A for the idler pulley (circled yellow) has to be kept loose.
 Figure 26. Gates K060465 belt for main drive
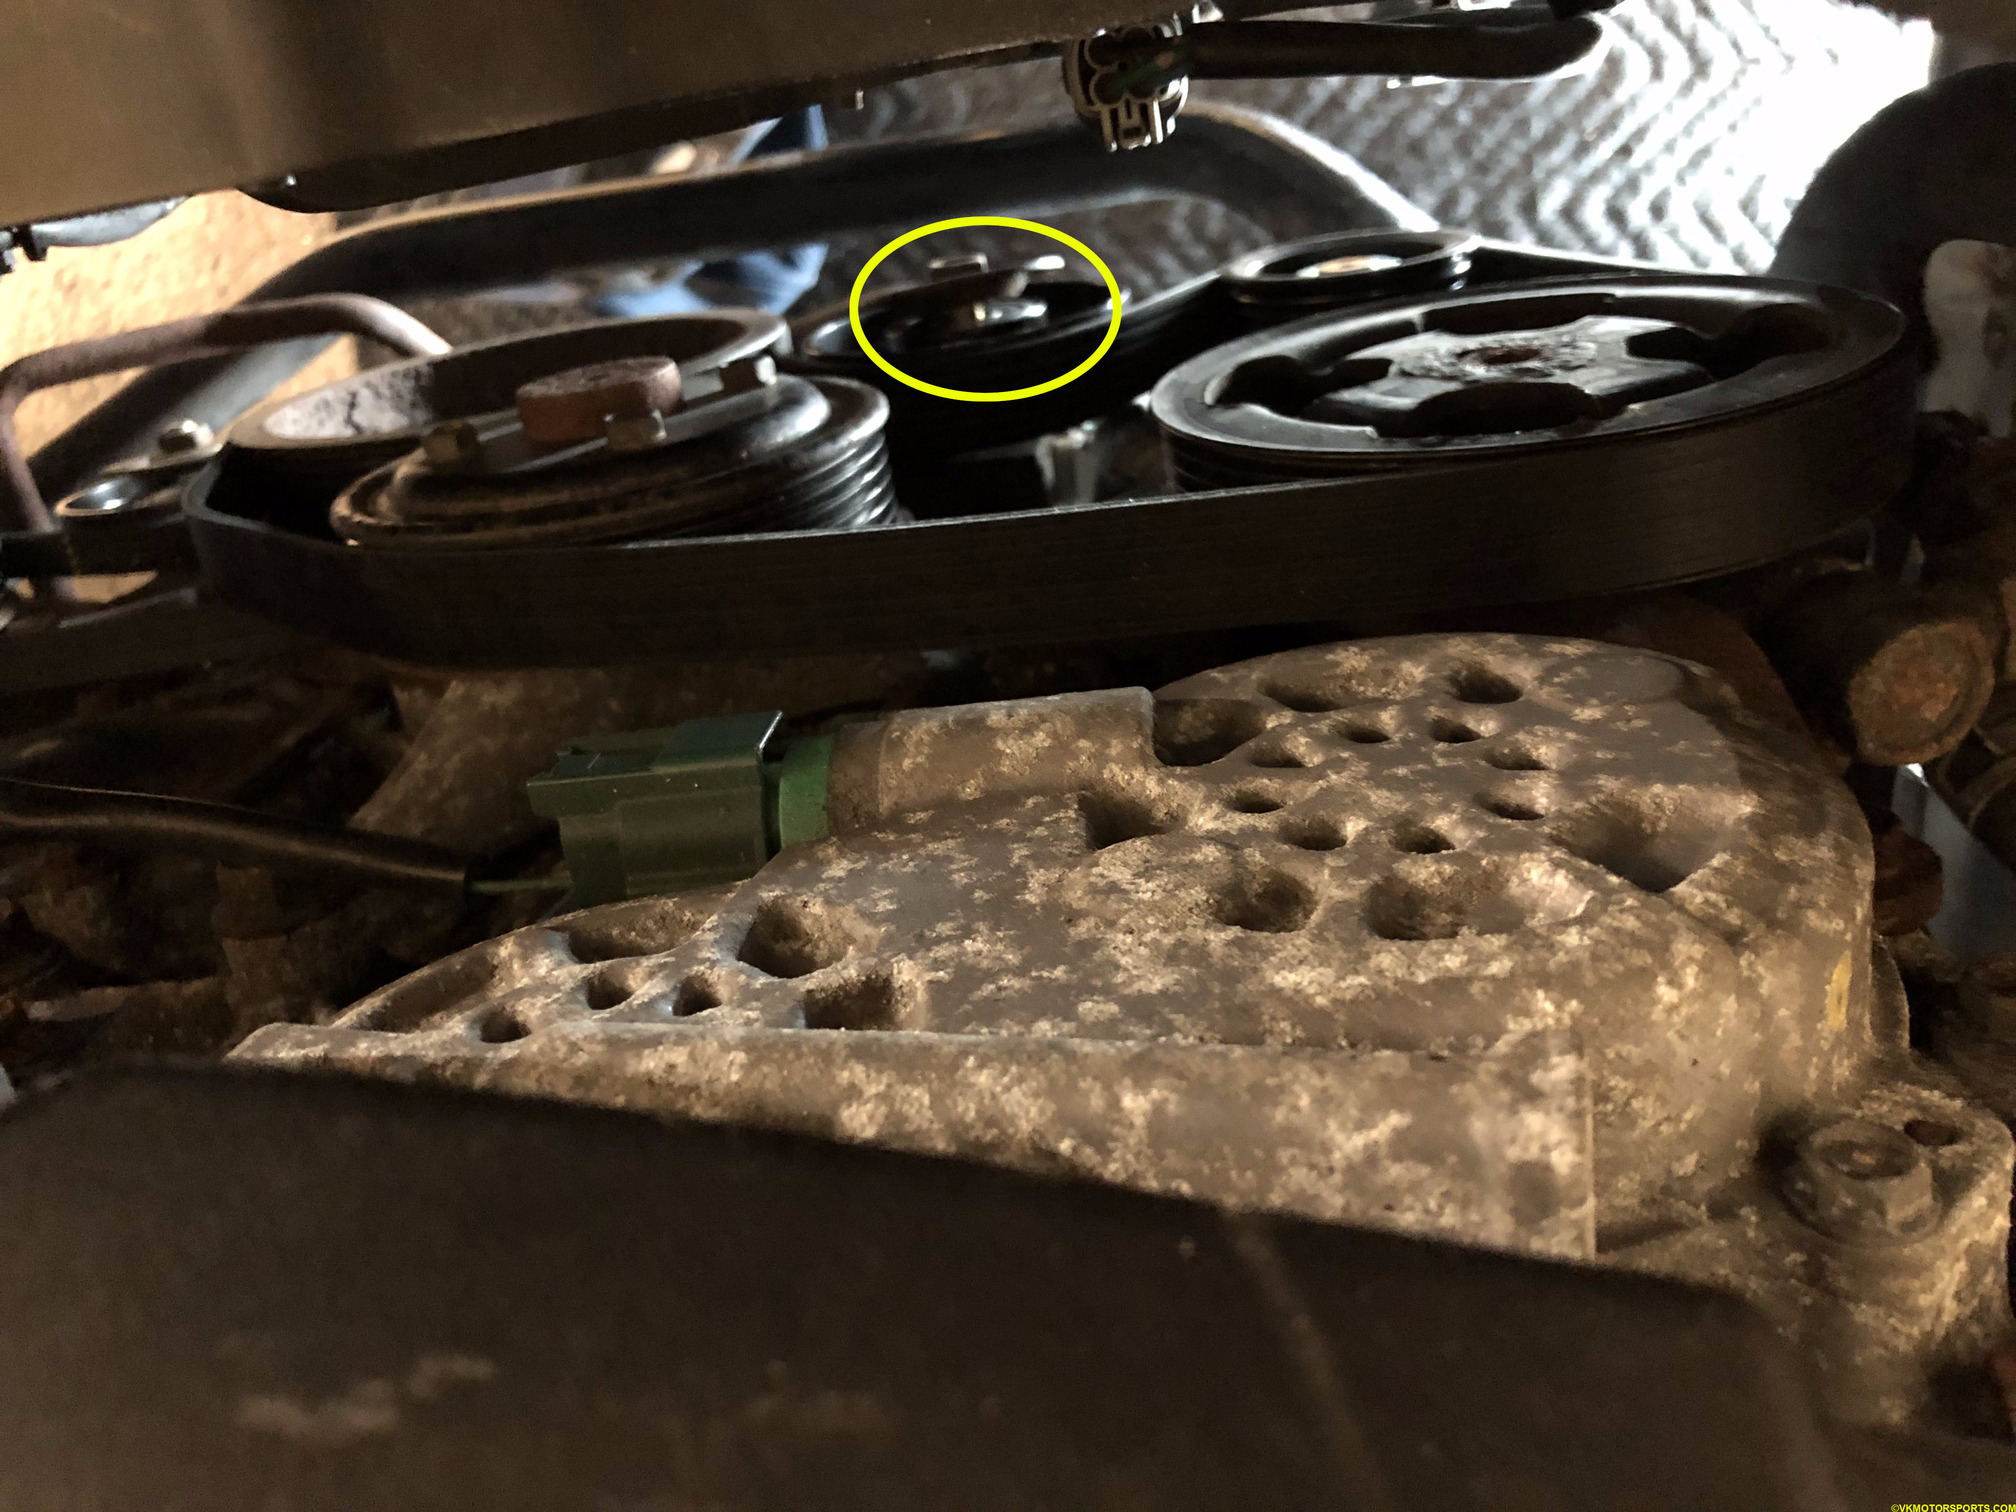 Figure 27. Main drive belt installed
BELT TENSION CHECK
Step 14: Now check the belt tension using the Krikit Gauge. Since we are using new belts and new pulleys we will refer to the tension adjustment columns for New belt in Figure 28. Figure 29 shows the positions on both the drive belts that should be used with the belt tension gauge to check for the tension.
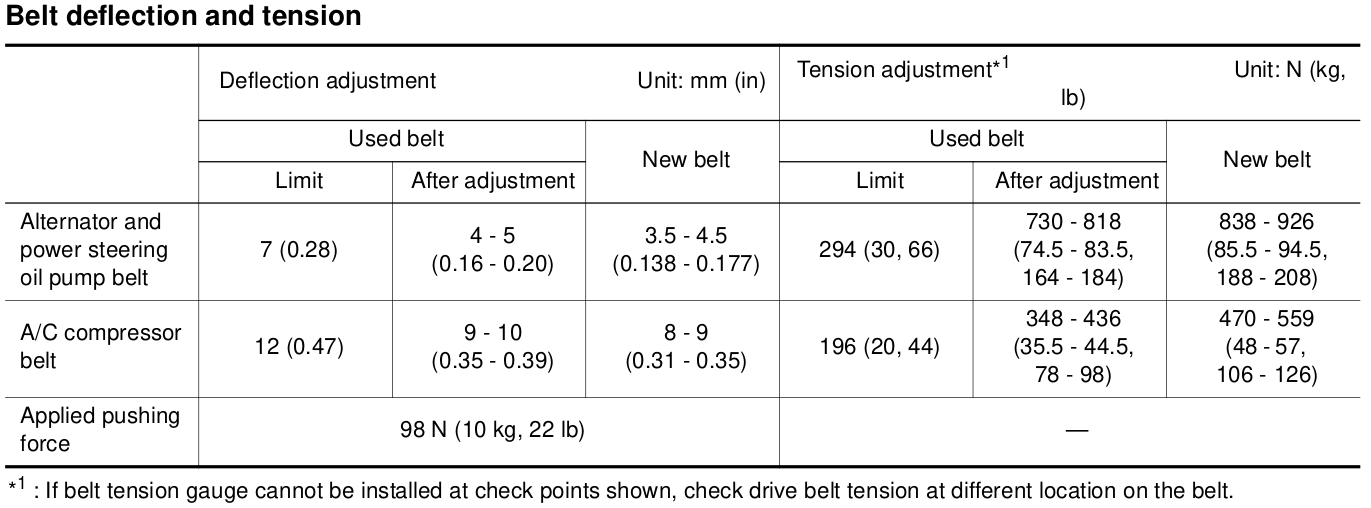 Figure 28. Tension adjustment measurements
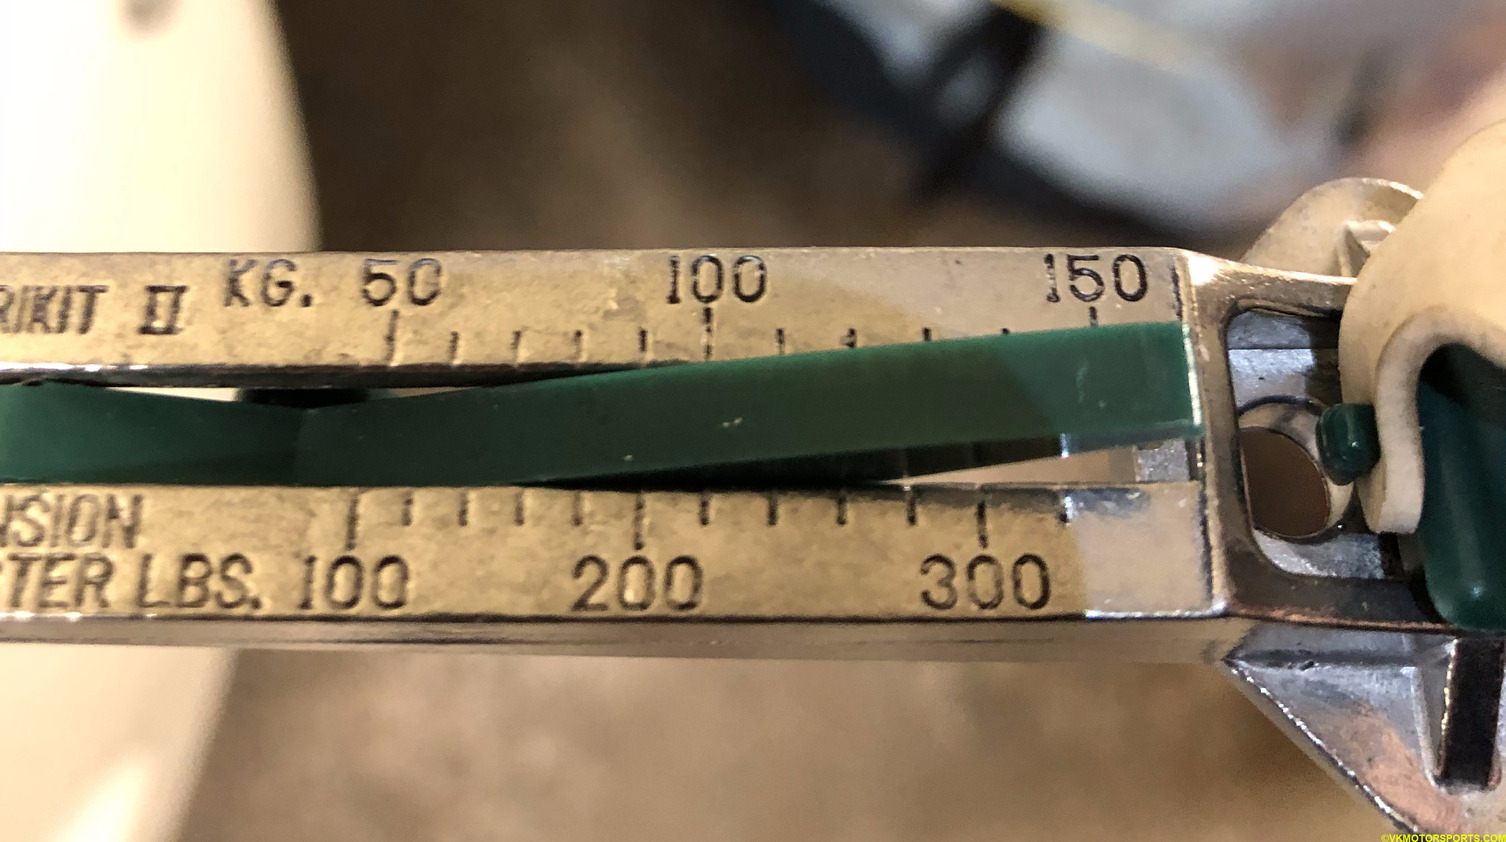 Figure 29. Belt tension check locations
Keep tightening the adjuster bolts until your gauge shows the right values. Figure 30 is an example of the main drive belt tension being in the range of 188-208 lb.
NOTE: Since the Krikit gauge is an analog gauge for measurement, make sure you take 3-4 readings of the tension to decide if it is tight enough.
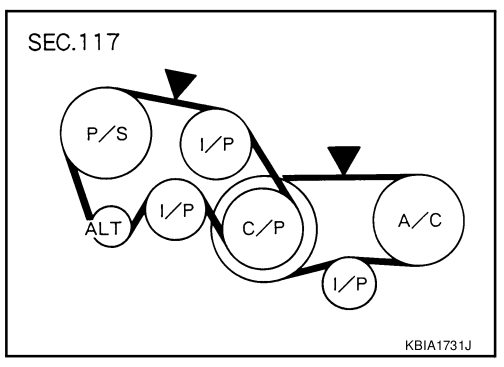 Figure 30. Belt tension measured using Krikit Gauge
Step 15: Tighten the A and C nut (as in Figure 1) and torque it to 26 ft-lb (34.8 N-m). Now start the car and make sure there is no belt squeal and your AC, power steering and alternator is working.
Below is a short video clip of the pulleys in action.